True smart home centralization isn’t about buying another hub; it’s about designing a layered control system that prioritizes reliability and intuitive use for everyone in the house.
- Prioritize a wired backbone and local processing to ensure critical functions like lights and locks work even when the internet is down.
- Design for people, not just tech: Use a mix of wall panels, physical buttons, and voice commands to make control effortless for family and guests.
Recommendation: Start by solving one specific family pain point with a simple, reliable automation—not by trying to connect everything at once.
Your phone screen is a mosaic of icons: one for the lights, another for the thermostat, a third for the security cameras, and a dozen more for everything from the blinds to the coffee maker. Each new smart device, meant to simplify your life, has added a layer of digital clutter. You’ve fallen into the “app fatigue” trap, where the dream of a seamless, automated home has become a frustrating reality of juggling more than 15 different applications. It’s a common problem that leaves homeowners feeling like they’re the ones being controlled by their technology, not the other way around.
The standard advice often circles around picking a single ecosystem—Google, Amazon, or Apple—or buying a universal smart home hub. While these are parts of the puzzle, they are not the whole solution. Simply funneling all your devices into one app doesn’t solve the core issues of reliability, ease of use for family members who aren’t tech enthusiasts, or what happens when your Wi-Fi inevitably fails. The problem isn’t just a lack of a central app; it’s a lack of a central philosophy.
But what if the key wasn’t finding the one perfect hub, but architecting a multi-layered control system? A system where reliability and intuitive access for everyone—from your spouse to your houseguests—dictate the technology choices, not the other way around. This approach shifts the focus from a purely technical integration to a human-centric design. It’s about creating a home that responds effortlessly, not one that requires a user manual for every guest.
This guide will walk you through the architectural principles of building a truly centralized and resilient smart home. We will explore how to design automations that enhance your daily life, choose the right interfaces for different users and situations, and build a reliable foundation that will serve you for years to come. It’s time to move beyond the chaos of apps and build a home that is genuinely smart.
To navigate this architectural approach, we’ve broken down the key decisions and strategies you’ll face. The following sections provide a clear roadmap for designing a system that is both powerful and a pleasure to use.
Summary: A Blueprint for Centralized Smart Home Control
- Good Morning Routine: How to Program Your Home to Wake You Up Gently?
- Wall Panels or Voice Assistants: Which Is More Practical for Guests?
- What Happens to Your Smart Home When the Internet Goes Down?
- CAT6 or Fiber: What Cabling Should You Run Before Closing the Walls?
- How to Get Your Spouse to Actually Use the Smart Home Interface?
- How to Automate Color Temperature to mimic the Sun From Dawn to Dusk?
- The Convenience of “Movie Mode”: Closing Blackout Blinds With a Voice Command
- How to Identify Energy Waste in a Smart Home That Should Be Efficient?
Good Morning Routine: How to Program Your Home to Wake You Up Gently?
A truly smart home doesn’t just execute commands; it anticipates your needs and enhances your well-being. Nowhere is this more apparent than in the morning routine. Instead of being jolted awake by a blaring alarm, you can orchestrate a symphony of devices to ease you into the day. This is a prime example of automation that solves a real human problem: the struggle of waking up.
The science supports a gentler approach. Studies show that being gradually exposed to light before waking can significantly reduce morning grogginess. Likewise, alarms based on music are less likely to cause sleep inertia compared to harsh beeps. By combining these principles, you can program a routine that works with your body’s natural rhythms. The goal is to create an environment that tells your body it’s time to wake up, long before your alarm has to.
Here is how you can structure this automation:
- Sunrise Simulation: Replace your traditional alarm with a smart device that mimics the sunrise by slowly increasing light levels for 15-30 minutes before your desired wake-up time.
- Natural Light: Program motorized shades to open gradually, allowing natural daylight to fill the room.
- Comfortable Temperature: Set your smart thermostat to begin warming the house 20-30 minutes before you get out of bed.
- Aroma and Sound: Have your smart plug-equipped coffee maker start brewing. Simultaneously, have a smart speaker play soothing music or a gentle news briefing with weather and traffic updates.
- Unified Trigger: Create a single routine in your central hub (like Google Home or Apple Home) that initiates all these actions with one trigger, such as “Good Morning” or a set time.
This isn’t just about convenience; it’s about designing a better start to your day. It demonstrates how a collection of individual devices can be unified to perform a single, high-impact task that feels seamless and supportive.
Wall Panels or Voice Assistants: Which Is More Practical for Guests?
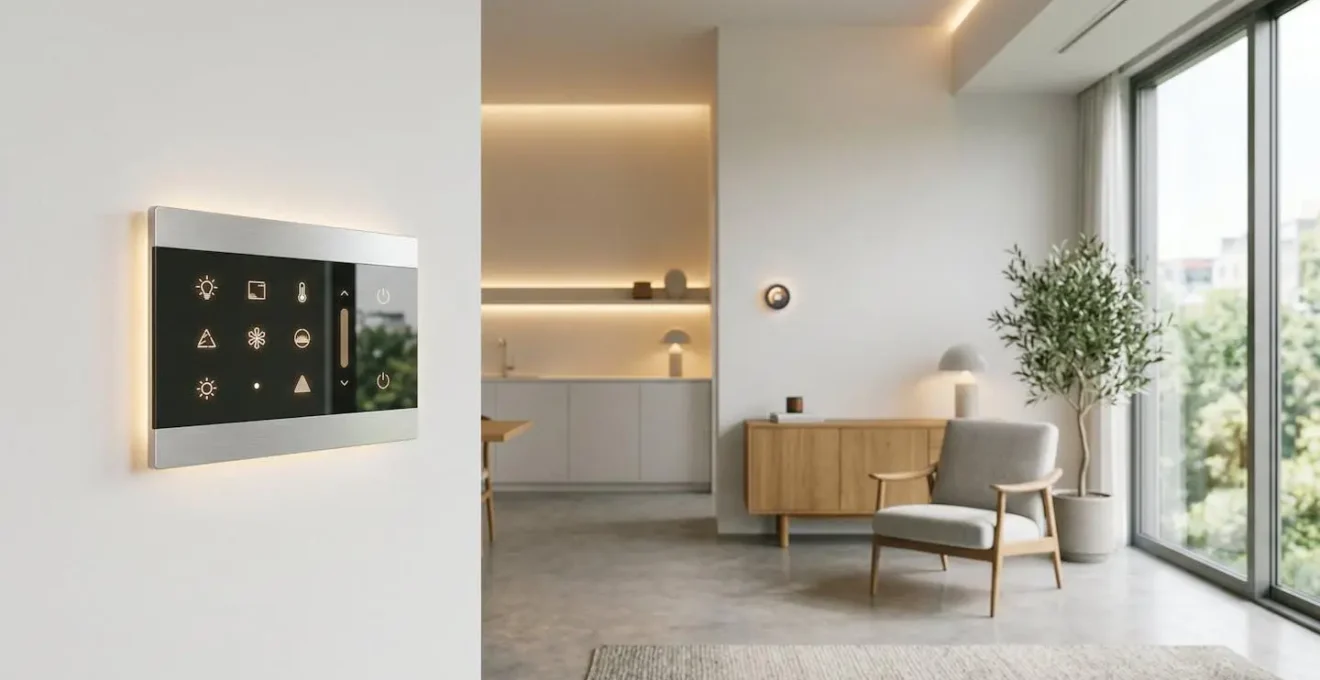
Centralizing control is useless if no one but you can use the system. When designing for others, especially guests or less tech-savvy family members, the choice of interface is critical. This brings us to a key architectural decision: relying on voice assistants versus installing dedicated wall-mounted touch panels. While voice control offers futuristic appeal, it often fails the test of intuitive, universal access.
For guests, the learning curve and social awkwardness of talking to a device can be significant barriers. Many people feel hesitant to speak commands, and issues with accents or background noise can lead to frustrating failures. In contrast, a wall-mounted panel provides a familiar, visual interface with clear buttons and immediate feedback. It’s a universally understood interaction model that requires zero training. This concept of “control layering”—providing multiple ways to control the same function—is essential for an adoption-driven design.
As the elegant interface above suggests, a wall panel can be a design element in itself, offering a premium feel. It provides a reliable, instantly responsive point of control that works for everyone, every time. The table below breaks down the practical differences when considering usability for guests.
| Feature | Wall-Mounted Panels | Voice Assistants |
|---|---|---|
| Learning Curve | Minimal – visual interface with clear buttons | Moderate – requires knowing specific voice commands |
| Reliability | High – instant touch response, no voice recognition errors | Variable – struggles with accents, background noise, or unclear commands |
| Guest Comfort | High – familiar touchscreen interaction, no verbal interaction required | Low to Moderate – many guests hesitant to speak to devices |
| Privacy Perception | High – no always-listening microphone concerns | Low – privacy concerns about constant audio monitoring |
| Aesthetic Integration | Premium feel – can be customized to match wall textures and decor | Minimal physical presence – invisible control |
| Multi-user Scenarios | Excellent – multiple people can see and use simultaneously | Poor – only one person can issue commands at a time |
What Happens to Your Smart Home When the Internet Goes Down?
A common nightmare for any smart home owner is an internet outage rendering their expensive setup useless. If you can’t turn on your lights because your Wi-Fi is down, your home isn’t smart—it’s fragile. This is where the concept of a “reliability backbone” becomes non-negotiable. A truly centralized system must be architected for resilience, ensuring that mission-critical functions operate independently of an internet connection.
This is achieved by prioritizing devices that use local control protocols like Zigbee or Z-Wave and hubs that can process automations locally. These devices create their own mesh network within your home, communicating directly with the hub without needing to send signals to a cloud server and back. This means your light switches, door locks, and thermostat will continue to function and automate even when the outside world is cut off. Cloud-dependent features like music streaming or remote access can fail, but your core home functions remain intact.
To build a resilient system, it’s crucial to categorize your devices and automations. A proven method is the 3-Tier Resilience Framework, which helps you prioritize what must work offline. According to smart home experts at CEDIA, you should always install smart switches over smart bulbs to guarantee a physical override is always available. This ensures anyone in the house can control the lights manually, the ultimate failsafe. Connecting your modem, router, and smart home hub to an Uninterruptible Power Supply (UPS) also provides a crucial buffer against short power cuts, keeping your local network online.
CAT6 or Fiber: What Cabling Should You Run Before Closing the Walls?
Before the drywall goes up is your one chance to build the “reliability backbone” of your smart home for the next 20 years. The question isn’t simply choosing between CAT6 and fiber; it’s about implementing a future-proof cabling strategy. The single most important decision you can make is not selecting a specific cable, but running empty conduit (often called “smurf tube”) to every key location. This allows you to pull whatever cable technology becomes standard in the next decade without tearing your walls apart.
With that foundation in place, a hybrid approach is best. A wired backbone provides unmatched reliability for fixed devices, while wireless protocols offer flexibility. Run CAT6a Ethernet cables to support current and near-future needs. Its Power over Ethernet (PoE) capability is crucial for powering devices like wall panels, security cameras, and Wi-Fi access points without needing a separate power outlet. Don’t just run cable to desks; think about “device hubs” like ceiling locations for access points and behind every TV.
Finally, don’t forget low-voltage wire. Running 2- or 4-conductor wire alongside your data cables provides dedicated power for devices like motorized blinds or wired sensors, ensuring they have a consistent and reliable power source that won’t fail with a dead battery. This multi-faceted approach ensures your home’s nervous system is robust, reliable, and ready for the future.
Your Pre-Drywall Cabling Checklist: A Future-Proof Strategy
- Run Conduit Everywhere: Install empty conduit (“smurf tube”) from your central network closet to all key locations (TVs, ceilings for access points, wall panel locations). This is your top priority.
- Install CAT6a for Data & PoE: Run at least one CAT6a cable to these same locations. Prioritize drops for Wi-Fi access points, AV racks, and the main smart home hub. A solid resource on panels suggests this is a key to a stable control panel setup.
- Add Low-Voltage Power Lines: Alongside the data cables, run 2- or 4-conductor low-voltage wire to locations for powered blinds, wired sensors, or keypads.
- Plan a Central Hub: Designate a closet or utility room as your “nerve center” where all cables terminate, housing your router, switch, and smart home hub.
- Document and Label Everything: Take photos and label both ends of every cable before the walls are closed. This will be invaluable for future upgrades or troubleshooting.
How to Get Your Spouse to Actually Use the Smart Home Interface?
The ultimate test of a smart home’s success isn’t its technical prowess, but its “spouse-approval factor.” If your partner finds the system confusing or unreliable, it has failed. This is the core of adoption-driven design: technology must be invisible and solve real problems to be accepted. The key is to shift your focus from showcasing technology to eliminating specific, daily frustrations.
Instead of explaining how you programmed a complex scene, frame it as a solution: “I made a single ‘Goodbye’ button by the door that turns off all the downstairs lights you always have to check before we leave.” This focuses on the benefit, not the feature. Physical buttons (like Flic or Lutron Pico) are often the gateway to acceptance. Placing a single-purpose button on the coffee table for “Movie Mode” or on the nightstand for “Bedtime” is far more approachable than asking someone to open an app or remember a voice command.
Co-creation is another powerful strategy. Sit down with your spouse and design automations together. Ask them, “What would your perfect morning routine look like?” or “What’s the most annoying thing about shutting down the house at night?” Building solutions to their pain points creates a sense of ownership and ensures the automations are genuinely useful. As one user noted after installing a simplified wall tablet, the family’s approval was won because it was faster and more intuitive than other methods.
A smart home user successfully won family approval by mounting a tablet with a simplified dashboard on the wall. The family highlighted how the iPad’s touch responsiveness made smart devices respond much faster compared to using voice control for simple tasks like turning on lights. Parents who previously complained about too many taps in the Apple Home app found Home Assistant’s straightforward interactive cards removed all friction, making the interface intuitive and family-friendly.
How to Automate Color Temperature to mimic the Sun From Dawn to Dusk?
One of the most sophisticated and beneficial automations is circadian rhythm lighting, where your smart lights automatically adjust their color temperature throughout the day to mimic the sun. This means cool, energizing blue-white light in the morning and midday, gradually transitioning to a warm, relaxing amber glow in the evening. This helps regulate your body’s natural sleep-wake cycle, improving both focus during the day and sleep quality at night.
Setting this up typically involves using a central hub that supports color temperature automation. You program a schedule that links the Kelvin value of your lights to the time of day. For example, your lights might be at 5000K (cool white) at noon, shift to 3500K (neutral white) in the late afternoon, and settle at 2700K (warm amber) after sunset. This creates a subtle, background automation that you don’t actively manage; you simply experience its benefits.
However, a truly smart system knows when to break its own rules. This is where contextual control becomes vital. Your circadian lighting is a flexible baseline, not a rigid program. You need the ability to override it for specific tasks. For example, the warm 2700K light that’s perfect for relaxing is terrible for cooking, where you need bright, clean light to see what you’re doing. The solution is to create task-based scenes that temporarily pause the circadian rhythm:
- ‘Cook’ Scene: Activates bright, clean 5000K light in the kitchen.
- ‘Focus’ Scene: Sets the office lights to a cool 4500K for concentration.
- ‘Dinner Party’ Scene: Locks in a static, warm amber glow for a cozy ambiance during entertaining.
- ‘Reading’ Scene: Provides focused 3500K task lighting over a chair without affecting the rest of the room’s warm tone.
These override scenes can be triggered by a physical button, a voice command, or a tap on a wall panel. This layered approach gives you the best of both worlds: a passive, wellness-enhancing automation running in the background, with the power to demand the perfect light for any task at a moment’s notice.
The Convenience of “Movie Mode”: Closing Blackout Blinds With a Voice Command
If you want to demonstrate the true power and magic of a well-architected smart home, there is no better example than a perfectly executed “Movie Mode” scene. This single command, whether spoken to a voice assistant or tapped on a button, encapsulates the entire philosophy of centralization: combining multiple disparate devices into one seamless, high-impact experience. It’s the ultimate payoff for your planning and a powerful tool for winning over skeptics.
A simple voice command like “Hey Google, turn on Movie Mode” can trigger a complex sequence of events that would otherwise require multiple apps and remote controls. A well-designed scene should orchestrate the following:
- Lighting: The main room lights dim to a low level (e.g., 10%) or turn off completely. Accent lighting, like behind the TV or under the console, may switch to a specific color and low brightness.
- Blinds and Shades: All motorized blackout blinds in the room automatically close to eliminate glare and create a cinematic environment.
- Audio/Video Equipment: The television or projector turns on. The AV receiver powers up and switches to the correct input (e.g., Apple TV, Blu-ray player).
The beauty of this automation lies in its simplicity from the user’s perspective. It solves a common, multi-step problem with a single, intuitive action. This is adoption-driven design in its purest form. It doesn’t require technical knowledge to use; it just works. Creating satisfying, one-touch solutions for recurring activities is one of the most effective ways to transform a collection of smart gadgets into a cohesive, intelligent home that the whole family will love to use.
Key takeaways
- A truly centralized system prioritizes reliability with a wired backbone and local processing.
- Design for humans: a mix of wall panels for guests, physical buttons for common tasks, and voice for convenience creates a system everyone can use.
- Future-proof your home not by picking a cable, but by running conduit to key locations before closing the walls.
How to Identify Energy Waste in a Smart Home That Should Be Efficient?
A common assumption is that a smart home is inherently an efficient one. While automations can certainly save energy, the dozens of always-on devices can introduce a significant new source of waste: “vampire power.” This is the electricity consumed by electronics in standby mode. A truly smart home is not just convenient, but also actively monitored for such inefficiencies.
Identifying this hidden waste is surprisingly straightforward. The most effective method is to conduct an energy audit using an energy-monitoring smart plug or a simple “Kill A Watt” meter. These devices sit between your appliance and the wall outlet, measuring exactly how much power is being drawn in real-time. By moving the meter between different appliances for 24-hour periods, you can pinpoint the worst offenders. Common culprits include TVs, game consoles, and any device with a standby light or digital clock.
The financial impact of these vampire loads can be substantial; some estimates suggest that vampire power may account for up to 25% of household electricity usage. Once you’ve identified the high-consumption devices, you can use your smart home system to eliminate the waste. For example, you can program a smart power strip to completely cut power to your entire entertainment center at night, or use smart plugs to put devices on a strict schedule. This proactive approach to efficiency is the final layer of a truly intelligent home—one that is not only convenient and reliable, but also mindful of its own consumption.
Architecting a centralized smart home is a journey from chaos to coherence. By focusing on a layered system of control, prioritizing a reliable backbone, and always designing for the people who live in the home, you can create a system that is powerful, resilient, and a genuine pleasure to use. The next logical step is to begin your own efficiency audit to ensure your smart home is as efficient as it is intelligent.