In summary:
- The secret to fixing clay isn’t just adding compost; it’s about creating the right fungal-dominant compost to build stable soil structure.
- Never till compost into clay soil. Instead, top-dress with compost and mulch to protect the vital soil life that creates natural drainage channels.
- Test your finished compost for phytotoxicity before applying it to ensure it’s mature and won’t harm your plants.
- Use deep-rooted native plants as the final step; they act as living drills, permanently breaking up compacted clay for you.
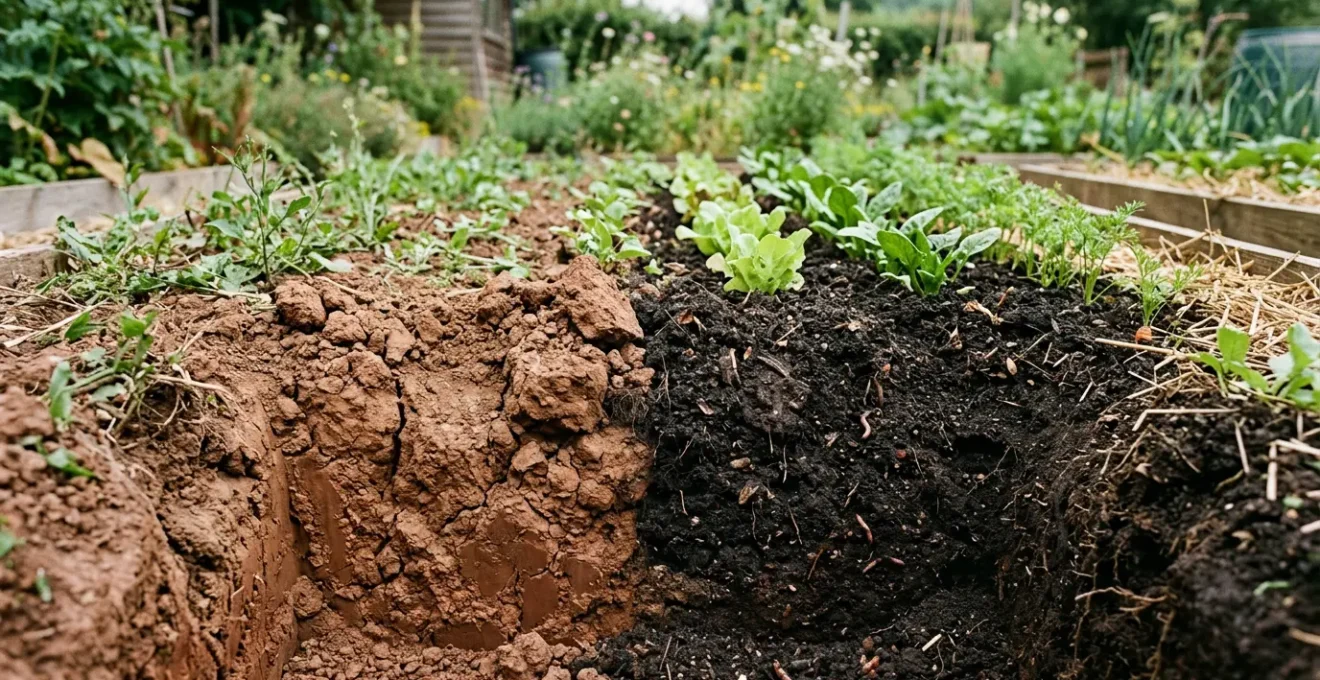
Every gardener with clay soil knows the feeling: the ground is either brick-hard in summer or a waterlogged swamp after a rain. You’ve been told the solution is simple: “just add compost.” So you do. You spend weekends hauling bags, turning it into the dense earth, and you wait. But the plants still struggle, their roots rotting in the same old muck. It feels like pouring good money and effort into a black hole.
The common advice often stops short of the real truth. It treats compost as a simple ingredient, like adding sand to a concrete mix. This overlooks the fundamental nature of both clay and compost. The problem isn’t just a lack of organic matter; it’s a lack of living structure. Tilling, for example, is often recommended, but it can destroy the very soil food web you’re trying to build. Similarly, not all compost is created equal; a wet, smelly, or unfinished pile can do more harm than good.
But what if the key wasn’t just *adding* compost, but actively *engineering* a living soil ecosystem? This guide reframes the approach. We will treat compost not as a generic soil filler, but as a powerful microbial inoculant. The goal is to cultivate a specific kind of organic matter that encourages the fungi, bacteria, and earthworms that will do the heavy lifting of restructuring your clay soil from within. It’s about building a permanent, self-draining system, not just temporarily fluffing up the topsoil.
This article will walk you through the entire process, from diagnosing your compost’s health by its smell to leveraging nature’s own soil builders. You’ll learn the science-backed methods that turn frustrating clay into the fertile, workable loam your plants have been dreaming of. Prepare to get your hands dirty and understand your soil on a much deeper level.
Summary: A Gardener’s Guide to Engineering Clay Soil
- Greens vs. Browns: Why Your Compost Pile Smells Like Garbage?
- Hot Composting: How to Turn Waste Into Gold in 18 Days?
- Top Dressing vs. Tilling: Which Method Preserves Soil Networks?
- Can You Compost in an Apartment Without Fruit Flies?
- The Phytotoxicity Test: Is Your Compost Ready or Will It Burn Seedlings?
- Are Household Cleaners Killing Your Compost’s Microbial Life?
- How Mulch Encourages Earthworms and Why You Need Them?
- Why Native Flora Saves You 50 Hours of Gardening Per Year?
Greens vs. Browns: Why Your Compost Pile Smells Like Garbage?
The first sign that your compost-making is going wrong is often the smell. A healthy pile should smell earthy and sweet, like a forest floor after rain. If it reeks of garbage, ammonia, or vinegar, it’s sending a clear distress signal. This isn’t just unpleasant; it’s a symptom of a fundamental imbalance in your compost’s diet, specifically the ratio of carbon (browns) to nitrogen (greens). For breaking down heavy clay, the goal is a fungal-dominant compost, and for that, research indicates that a carbon-to-nitrogen ratio of around 24 to 1 is optimal.
Think of it as building a fire. Nitrogen-rich “greens” (like grass clippings, coffee grounds, and kitchen scraps) are the fuel. They provide the protein for microbes to multiply, generating heat. Carbon-rich “browns” (like dry leaves, wood chips, and shredded cardboard) are the logs. They provide the long-burning energy source and create air pockets for oxygen. Too much nitrogen without enough carbon is like pouring gasoline on a fire; it flashes up with an ammonia smell and burns out, leaving a slimy, anaerobic mess. Too much carbon is like a pile of damp logs with no kindling; it just sits there, cold and inert.
Learning to read the smells is the most essential skill in compost engineering. An ammonia scent means you’ve added too many greens. A rotten egg or garbage smell means the pile is too wet and has gone anaerobic (lacking oxygen). A sour, vinegary smell points to an overabundance of acidic greens. Each smell has a simple remedy: add more carbon-rich browns and turn the pile to introduce oxygen. Mastering this balance is the first step from simply piling up waste to actively cultivating a powerful soil amendment.
Your diagnostic checklist: What is your compost pile telling you?
- Sweet-smelling or earthy odor: Your pile is healthy. This indicates proper aerobic decomposition with a balanced C:N ratio (25-30:1).
- Garbage/rotten egg smell: Your pile is anaerobic. It’s likely too wet or compacted. Turn the pile and add dry brown materials like wood chips or straw.
- Ammonia smell: You have excess nitrogen. The C:N ratio is too low (below 15:1). Immediately add a large volume of carbon-rich materials like shredded cardboard or sawdust.
- Vinegary/sour smell: Acidic fermentation is occurring from too many greens. Balance the pile by mixing in lignin-rich browns and turning it to increase oxygen flow.
- No smell and no heat: You have too much carbon. The C:N ratio is too high (above 40:1). Add nitrogen-rich greens like fresh grass clippings or manure to kickstart microbial activity.
Hot Composting: How to Turn Waste Into Gold in 18 Days?
For the gardener serious about amending clay soil, waiting 6-12 months for traditional “cold” composting is too slow. The solution is hot composting, an intensive method that can produce finished, high-quality compost in as little as 18 days. The most famous technique is the Berkeley Method, which relies on creating a perfect environment for thermophilic (heat-loving) bacteria to work at maximum speed. This isn’t just about speed; the high temperatures—between 131-149°F (55-65°C)—are crucial for killing weed seeds and pathogens, ensuring the final product is clean and safe to use.
The key to success is achieving a “critical mass.” The pile must be at least one cubic meter (about 3x3x3 feet) to generate and retain enough internal heat. Smaller piles simply lose heat to the surrounding air too quickly. Equally important is preparing the materials. All ingredients, especially woody browns, must be shredded or chipped to a small size (1/2 to 1-1/2 inches) to maximize the surface area available for microbes to attack. Think of it as pre-chewing the food for your microbial workforce.
The process is a rigorous cycle of monitoring and turning. You build the pile in one go, alternating thin layers of greens and browns, and ensuring it’s as damp as a wrung-out sponge. The temperature will spike within a day or two. The core rule is to turn the pile every 48 to 72 hours, moving the cooler outer material to the hot center. This re-oxygenates the pile, balances temperatures, and ensures all material is processed evenly. After about 18 days of this active phase, the pile will stop heating up. The resulting material is not yet “finished” but should be moved to a separate location for a few weeks to “cure,” allowing fungal populations to establish, which are essential for building aggregate stability in clay soil.
Top Dressing vs. Tilling: Which Method Preserves Soil Networks?
For generations, the accepted wisdom for adding amendments was to till them into the soil. However, for clay, this is one of the most destructive things you can do. Tilling is a form of massive soil disturbance. It pulverizes the soil, shatters its fragile structure, and, most importantly, destroys the delicate, web-like strands of mycelial fungi. These fungi are the master engineers of healthy soil, and their preservation is the entire point of our compost-making efforts.
These fungal hyphae excrete a sticky glycoprotein called glomalin, which acts as a “bio-glue.” It binds the microscopic, flat clay platelets into larger, crumb-like structures called aggregates. The spaces between these aggregates create the very pores and channels that allow for water drainage and air penetration. When you till, you snap every one of these vital threads, collapsing the structure and turning your soil back into a dense, compacted mass that is even more prone to waterlogging.
The correct, structure-building approach is top dressing. This no-till method involves simply spreading a layer of finished compost (typically 1-2 inches) directly on the soil surface. This respects the existing soil life and essentially “feeds” it from above. Earthworms and other soil organisms will come to the surface, pull the organic matter down into the soil, and do the “tilling” for you through a process called bioturbation. Their burrows become permanent drainage channels, lined with nutrient-rich castings. This method mimics how nature builds soil in a forest, with leaves and other organic debris falling on the surface and slowly being incorporated from the top down. It’s a slower start, but it builds a resilient, long-lasting soil structure that tilling can only dream of.
Can You Compost in an Apartment Without Fruit Flies?
The principles of composting aren’t limited to those with large gardens. For city dwellers with heavy clay in their container pots, creating nutrient-rich amendments indoors is entirely possible. However, the challenges are different: space is limited, and the tolerance for odors and pests is zero. The two most effective indoor methods are Bokashi and vermicomposting (worm bins), each with distinct advantages for apartment life and for amending potted clay soil.
Bokashi is an anaerobic fermentation process, not true composting. It uses a special inoculated bran to “pickle” all food scraps—including meat, dairy, and oils that are forbidden in other systems—in an airtight bucket. The process is fast (about two weeks) and produces a “pre-compost” and a nutrient-rich liquid “tea.” The main advantage is its ability to handle all kitchen waste. The primary output for a container gardener, the Bokashi tea, is an excellent liquid fertilizer and soil drench that helps introduce beneficial microbes to the dense potting clay.
Vermicomposting, on the other hand, uses red wiggler worms in a bin to actively decompose fruit and vegetable scraps. The final product, worm castings, is arguably the world’s best soil amendment. It’s a pH-neutral, finely-textured material packed with enzymes and microbes. For container clay soil, blending in a handful of worm castings provides an immediate improvement in aeration and structure. While it’s a slower process and can’t handle all food types, the quality of the final product is unparalleled for improving the texture of potted soil.
A table from an analysis of indoor composting methods helps compare the two systems for small spaces.
| Feature | Bokashi Composting | Vermicomposting (Worm Bins) |
|---|---|---|
| Process | Anaerobic fermentation using microbes | Aerobic decomposition using red wiggler worms |
| Time to Finished Product | 2 weeks fermentation + 2-4 weeks curing | 2-3 months for finished castings |
| Accepted Materials | All food waste including meat, dairy, oils | Fruit/vegetable scraps, coffee grounds, paper; NO meat, dairy, oils |
| Space Required | Small bucket (5 gallons typical) | Small to medium bin (varies by household size) |
| Odor Level | Sour/fermented smell when opened; sealed container prevents escape | Earthy smell; minimal if balanced properly |
| Output for Clay Pots | Acidic pre-compost + bokashi tea liquid | Neutral pH worm castings (ideal for containers) + compost tea |
| Maintenance | Low; add scraps + bran, drain tea weekly | Moderate; monitor moisture, add bedding, harvest castings |
| Best Use for Clay Soil | Bokashi tea as soil drench to break down clay structure | Worm castings blended into pots (fine texture improves aeration immediately) |
The Phytotoxicity Test: Is Your Compost Ready or Will It Burn Seedlings?
One of the biggest mistakes a gardener can make is applying “unfinished” compost to their soil. Immature compost can be phytotoxic, meaning it contains substances that are harmful to plant growth. This can manifest in two ways. First, if the compost is still actively decomposing, the microbes will consume available nitrogen from the surrounding soil to fuel their work, effectively “robbing” it from your plants and causing them to turn yellow and stunted. Second, a wet, anaerobic pile can produce high levels of ammonia or organic acids that can literally burn the delicate roots of seedlings.
How can you be certain your compost is finished and ready? The look, feel, and smell are good indicators—it should be dark, crumbly, and smell earthy. But for a definitive answer, especially before amending a large area of clay soil, the best method is a simple bioassay: the phytotoxicity test. This involves using sensitive, fast-growing seeds to test the compost’s safety.
This simple visual test provides clear, actionable data about your compost’s maturity, moving you from guesswork to confident soil engineering.
Case Study: The Three-Pot Comparative Phytotoxicity Test
Advanced gardeners use a three-pot comparative test to diagnose compost readiness beyond a simple pass/fail. The protocol involves planting fast-growing, sensitive seeds (radishes or beans are preferred) in three controlled conditions. Pot 1 is a 100% commercial potting mix (the control). Pot 2 is a 50/50 mix of potting soil and your test compost. Pot 3 is 100% your test compost. After monitoring for 7-14 days, the results are diagnostic. If seeds fail to germinate in the 100% compost pot but sprout in the control, high ammonia levels are likely present. If seeds germinate but show yellow, stunted growth in the compost mixes compared to the control, “nitrogen robbing” from unfinished decomposition is occurring. Truly finished, high-quality compost will produce seedlings that are equal to or even healthier than the control group, confirming it is ready for application.
Are Household Cleaners Killing Your Compost’s Microbial Life?
As you build a thriving microbial ecosystem in your compost pile, it’s critical to consider what you’re feeding it. This goes beyond the C:N ratio of food scraps and yard waste. A often-overlooked source of contamination comes from the paper towels and napkins used for household clean-ups. While the paper itself is a great carbon source, the cleaning agents it’s soaked in can be either benign or devastating to your compost’s microbial life.
Think of your compost pile as a sensitive living organism. Introducing harsh chemicals is like taking a dose of antibiotics; it can wipe out the beneficial bacteria and fungi you’ve worked so hard to cultivate. Cleaners containing bleach, ammonia, or quaternary ammonium compounds (found in many antibacterial sprays) are particularly harmful. They are designed to sterilize surfaces, and they will do the same to your compost, effectively killing the decomposition process and potentially introducing persistent toxins into your future garden soil. This can halt the creation of the very humic substances needed to improve clay structure.
On the other hand, many cleaners are perfectly safe. Simple solutions like white vinegar, baking soda, and natural Castile soap are readily broken down by microbes. Even stronger disinfectants like hydrogen peroxide or high-proof alcohol, when used on a paper towel, will largely evaporate or break down into harmless water and oxygen before they can cause significant damage to a large compost pile. The key is to be a conscious gatekeeper. By choosing compost-safe cleaners for everyday spills, you protect your microbial workforce and ensure that the paper products you add are contributing helpful carbon, not a dose of poison.
This table helps distinguish which cleaners will support your soil-building efforts and which will sabotage them.
| Product Category | Green-Light (Compost-Safe) | Yellow-Light (Use with Caution) | Red-Light (Compost-Harmful) |
|---|---|---|---|
| All-Purpose Cleaners | White vinegar, Castile soap, Baking soda | Plant-based enzyme cleaners (check pH) | Bleach-based cleaners, Ammonia-based products |
| Disinfectants | Hydrogen peroxide (3%), Essential oil blends | Alcohol-based (70%+ ethanol, dilute well) | Antibacterial sprays with triclosan, Quaternary ammonium compounds |
| Kitchen Cleaners | Lemon juice, Salt scrubs, Soap nuts | Dish soap (phosphate-free, biodegradable) | Degreasers with petroleum solvents |
| Paper Products Used With | Safe to compost paper towels/napkins used with green-light cleaners | Limit quantity; microbes may be temporarily suppressed | Never compost paper products used with these; dispose as trash |
| Impact on Clay Soil | Supports microbial diversity needed for clay aggregate formation | May temporarily slow composting process | Kills beneficial bacteria and fungi; can sterilize compost and harm soil structure |
How Mulch Encourages Earthworms and Why You Need Them?
Once you have high-quality, finished compost, the next step is to use it to attract the real heroes of clay soil amendment: earthworms. Earthworms are nature’s master soil engineers. Their constant burrowing, a process known as bioturbation, creates deep, stable channels that dramatically improve water drainage and aeration. As they move through the soil, they consume organic matter and excrete “castings,” which are perfectly pH-balanced and packed with beneficial microbes. As an expert at the Central Texas Gardener notes, these castings are the ultimate soil conditioner.
Worm castings (vermicast) are a powerful ‘bio-glue’, binding tiny clay particles into large, stable aggregates that create permanent drainage channels.
– Central Texas Gardener (Texas PBS), Article on amending clay soil
So, how do you attract them? By creating the perfect habitat. Earthworms need three things: food, moisture, and protection from predators and sun. A simple top-dressing of compost isn’t enough. The most effective method is creating a “compost-mulch sandwich” directly on top of your clay soil. This technique, often called sheet mulching, involves layering materials to create an irresistible worm environment. You start with a layer of cardboard to suppress weeds, add a thick layer of compost as the food source, and then top it all with a 3-4 inch layer of wood chip mulch. The mulch acts as a protective “house,” keeping the compost moist and dark, which is exactly what worms love.
The results are transformative. Within weeks, you’ll find a thriving earthworm population has moved in. They will work tirelessly, pulling the compost down from the surface and mixing it deep into the clay profile, far more effectively than any tiller could. This process builds deep, resilient soil structure from the top down, without any of the destructive side effects of mechanical digging. It’s the ultimate partnership between gardener and nature.
Key takeaways
- Clay soil’s problem isn’t just density; it’s a lack of living structure, which tilling destroys but top-dressing builds.
- Compost is a microbial inoculant. Its quality, determined by the C:N ratio and maturity, dictates its ability to engineer soil.
- The ultimate, low-effort solution involves using compost and mulch to attract earthworms and then planting deep-rooted native flora to create permanent drainage channels.
Why Native Flora Saves You 50 Hours of Gardening Per Year?
The final and most powerful step in permanently amending clay soil is to stop fighting it and start working with plants that are genetically programmed to thrive in it. After you have improved the top layer with compost and mulch, introducing clay-busting native plants is like hiring a team of permanent, underground engineers. These plants have evolved over millennia to handle the specific challenges of your local soil. Unlike delicate annuals or turf grass with shallow roots, many native prairie plants and wildflowers have incredibly deep and robust root systems that are designed to penetrate dense soil.
These root systems perform several crucial functions. Plants with deep taproots, like False Indigo (Baptisia australis) or Compass Plant (Silphium laciniatum), act like living drills, punching through compacted hardpan layers sometimes many feet deep. When these roots die back, they leave behind open channels for water and air. Plants with dense, fibrous root systems, like Prairie Dropseed grass, create a web that binds clay particles into stable aggregates in the topsoil. Others are nitrogen-fixers, adding fertility as they grow. They are, in essence, a living, self-perpetuating system of soil amendment.
The benefit is a massive reduction in labor. Because these plants are perfectly adapted, they require less watering, less fertilizing, and less fussing. Once established, they create a resilient ecosystem that takes care of itself. In fact, gardening experts estimate that switching to a garden of native plants can save you more than 50 hours of work per year in watering, mowing, and maintenance. You stop being a constant interventionist and become the custodian of a thriving, self-sufficient ecosystem that is also improving your soil structure 24/7.
This table showcases a few examples of native plants and the specific functions their roots perform in breaking up and improving clay soil.
| Plant Category | Example Species | Root Type | Primary Function for Clay | Depth Penetration |
|---|---|---|---|---|
| Deep Taproot Specialists | Baptisia australis (False Indigo), Prairie Dock (Silphium terebinthinaceum) | Single deep taproot | Breaks through hardpan layer; creates permanent vertical drainage channels | 6-15 feet |
| Fibrous Root Formers | Prairie Dropseed (Sporobolus heterolepis), Little Bluestem (Schizachyrium scoparium) | Dense, fine fibrous network | Binds clay particles into stable aggregates; improves top 12 inches | 1-3 feet |
| Rhizomatous Spreaders | Wild Bergamot (Monarda fistulosa), Goldenrod (Solidago sp.) | Horizontal underground stems | Lateral soil aeration; distributes organic matter through die-back cycles | 6-18 inches |
| Nitrogen Fixers | Leadplant (Amorpha canescens), Wild Lupine (Lupinus perennis) | Taproot with nodules | Adds nitrogen while drilling; creates air pockets as roots decay | 3-8 feet |
| Hydraulic Lift Performers | Compass Plant (Silphium laciniatum), Cup Plant (Silphium perfoliatum) | Massive taproot (3+ inch diameter) | Pulls deep water to surface during drought; sustains microbial activity in amended topsoil | 10-18 feet |
By shifting your perspective from “fighting clay” to “building a living soil ecosystem,” you can permanently transform your garden. This process, rooted in understanding the microbial life in your compost and soil, turns a frustrating chore into a rewarding partnership with nature.