The key to a truly minimalist kitchen isn’t just hiding appliances; it’s engineering a seamless living space that eliminates visual and functional friction.
- Effective design prioritizes flawless integration and ergonomic foresight over simple concealment.
- Technical details like ventilation, hardware durability, and signal transparency are critical for long-term success.
Recommendation: Focus on solving the underlying functional challenges—heat, access, and clutter—to achieve a state of true “visual silence” where your kitchen merges perfectly with your living area.
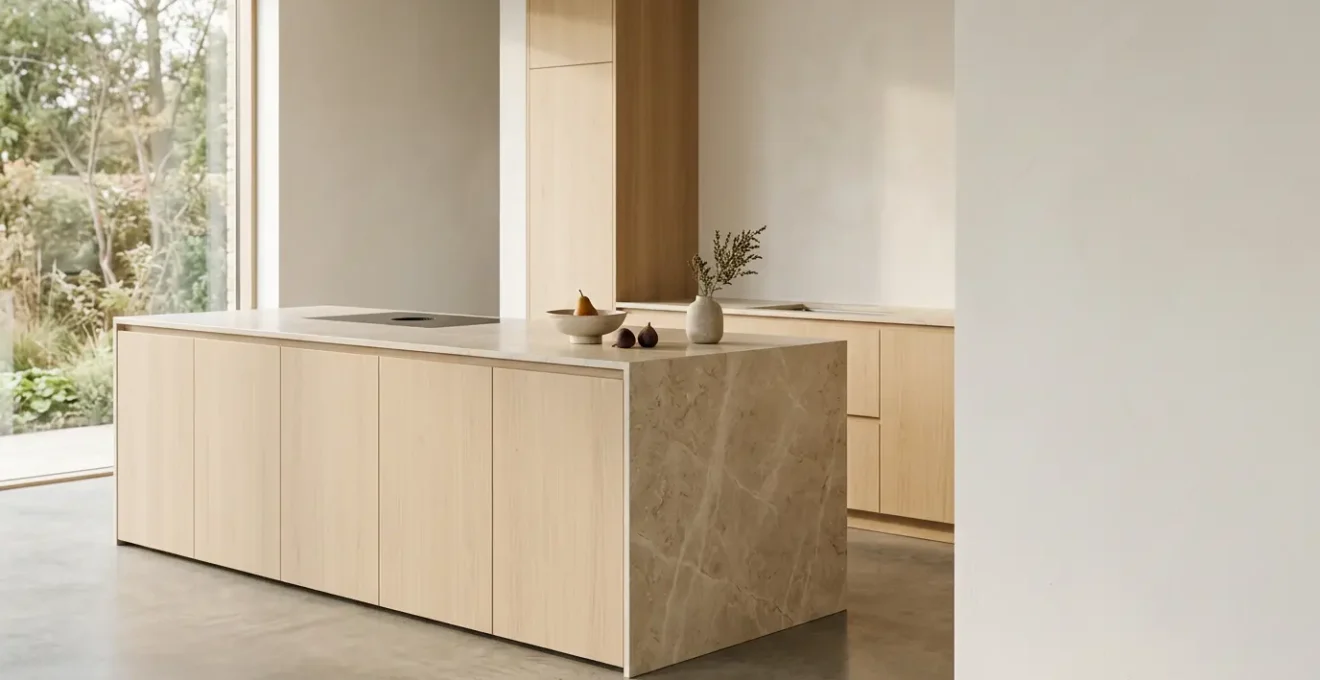
For homeowners renovating an open-plan space, the ultimate goal is often a kitchen that doesn’t look like a kitchen. It should feel like an extension of the living room, a serene backdrop for daily life. The common advice is to use panel-ready appliances and handle-less cabinets, creating a monolithic, clean-faced wall of storage. This is a good start, but it only scratches the surface. This approach often leads to functional compromises and overlooks the subtle details that separate a merely hidden kitchen from a truly seamless one.
The real challenge lies in achieving what designers call visual silence. It’s a state where not only are the appliances concealed, but the very mechanisms of the kitchen—its sounds, its heat, its operational needs—are thoughtfully managed and integrated. It’s an approach rooted in engineering as much as aesthetics. But what if the key wasn’t simply choosing hidden appliances, but in mastering the invisible infrastructure that supports them? This guide moves beyond the obvious to explore the critical, often-overlooked decisions that create a frictionless, minimalist kitchen that is as beautiful to use as it is to behold.
We will delve into the nuances of hardware durability, the costly mistakes in space planning, the essential thermal management for electronics, and the ergonomic considerations that ensure your minimalist space is livable for years to come. By focusing on these details, you will learn how to create a kitchen that is not just hidden, but harmoniously integrated into your home.
This article provides a detailed roadmap to achieving a truly seamless kitchen. Explore the sections below to master every aspect of minimalist kitchen design, from the smallest hardware choice to the overall cohesion of your living space.
Summary: The Art and Science of the Invisible Kitchen
- Push-to-Open vs. Edge Pulls: Which Is More Durable for Heavy Drawers?
- The ‘Dead Space’ Mistake in Corner Cabinets That Wastes 20% of Storage
- Why Does Custom Concealed Storage Cost 40% More Than Standard Units?
- How to Hide Your Media Console Without Overheating Your Electronics?
- When to Avoid Handle-Less Cabinets if You Plan to Age in Place
- How to Hide Hubs and Routers Without Blocking the Signal?
- Do You Need Special Wiring for Tunable White LED Strips?
- How to Apply Minimalist Principles Beyond the Kitchen for a Cohesive Home?
Push-to-Open vs. Edge Pulls: Which Is More Durable for Heavy Drawers?
The choice between push-to-open mechanisms and integrated edge pulls seems purely aesthetic, but it has significant implications for durability and daily use, especially with heavy drawers for pots and pans. A push-to-open system relies on a spring-loaded latch. While wonderfully minimalist, these mechanisms are mechanical and subject to wear. For a heavy, frequently used drawer, the repeated force can lead to misalignment or failure over time. Furthermore, their operation requires you to press on the drawer front, which can lead to a build-up of fingerprints and smudges on high-gloss or dark finishes.
Edge pulls, or recessed handles, offer a more robust and direct interaction. They are routed into the top or side edge of the cabinet door or drawer, providing a discreet but solid grip. Because you are pulling directly on the drawer structure, there is less strain on a delicate mechanism. This makes them a superior choice for heavy-duty storage. They also offer a tactile certainty that push-to-open systems lack; you never have to wonder if it will pop open correctly.
As the team at Corner Renovation points out when discussing handle-less kitchens, edge pulls also have a practical advantage in cleanliness.
Fingerprints and smudges are less of an issue because you grasp the recessed handle rather than pushing it onto the door surface as you would with a push-to-open mechanism.
– Corner Renovation, Push-to-open vs Recessed Handles for Handleless Kitchen
Ultimately, for items like dish drawers or large pantries, the mechanical simplicity and durability of edge pulls make them the more reliable long-term solution for a high-functioning minimalist kitchen. Reserve push-to-open for lighter, less-frequently used upper cabinets.
The ‘Dead Space’ Mistake in Corner Cabinets That Wastes 20% of Storage
Corner cabinets are the Bermuda Triangle of kitchen design. Traditional fixed shelves or basic lazy Susans often create a deep, inaccessible void where items are lost and forgotten, wasting a significant percentage of potential storage. For a minimalist kitchen where every inch must be functional, this “dead space” is an unacceptable flaw. The mistake is not the corner itself, but the failure to equip it with high-performance access mechanisms that bring the contents of the cabinet to you.
Modern engineering has solved this problem with sophisticated solutions like LeMans pull-outs, Magic Corners, or custom-designed corner drawers. These systems use articulated shelves that swing completely out of the cabinet, presenting the entire contents for easy access. They transform an awkward, frustrating space into prime real estate for bulky items like pots, stand mixers, or small appliances. The investment in this hardware is a direct investment in frictionless living, eliminating the need to kneel and rummage through a dark cabinet.
The visual below showcases the precision of such a system. Instead of a dark, empty void, the space is fully optimized with rotating shelves that make every item immediately accessible. This is the essence of invisible engineering: a complex solution that creates an effortlessly simple user experience.
Case Study: The Functional Alternative to a Corner Cabinet
In a real-world example of prioritizing function over form, a homeowner opted to completely block off the corner cabinet space. Instead, they installed wide, deep drawers on either side of the corner. They found that the fully accessible storage provided by these full-extension drawers was far more practical for their pots and appliances than any traditional corner solution. This demonstrates a key minimalist principle: it is better to have less but perfectly functional storage than more space that is poorly optimized and difficult to use.
Why Does Custom Concealed Storage Cost 40% More Than Standard Units?
Achieving a truly seamless look with concealed appliances is an exercise in precision, and precision comes at a premium. The significant cost increase for custom concealed storage over standard cabinetry isn’t arbitrary; it reflects a convergence of material quality, specialized labor, and intricate hardware. Standard cabinet units are mass-produced to common dimensions. Custom work, by contrast, is a bespoke process tailored to the exact specifications of your space and your chosen appliances.
The cost is driven by several factors. First, panel-ready appliances are inherently more expensive than their freestanding counterparts. Second, the cabinetry must be built with extreme accuracy—tolerances are often measured in millimeters—to ensure the appliance panels align perfectly with adjacent doors and drawers, creating that monolithic look. This requires a higher level of craftsmanship. Finally, the specialized hardware needed for these applications—heavy-duty hinges for refrigerator panels, retractable door systems, and robust push-to-open mechanisms—is far more complex and costly than standard hardware. As recent data from kitchen renovation specialists shows, fully custom cabinetry can cost from $500 to over $1,200 per linear foot.
This premium is not just for aesthetics; it’s for the engineering required to make the kitchen function flawlessly. A poorly integrated custom job will quickly lead to sagging doors, misaligned panels, and failing hardware, destroying both the look and the usability of your space.
Your Checklist for Understanding Custom Costs
- Material & Labor: Factor in the cost of precise measurements and skilled craftsmanship required for seamless integration.
- Specialized Mechanisms: Budget for custom cabinetry with specialized hardware like push-to-open or retractable systems.
- Appliance Panels: Account for the price of panel-ready appliances designed to match your cabinetry fronts.
- Hardware Quality: Include high-quality hardware like soft-close hinges and full-extension slides in your cost analysis.
- Professional Installation: Ensure your budget covers professional installation to guarantee proper alignment and lifelong operation.
How to Hide Your Media Console Without Overheating Your Electronics?
Extending the minimalist aesthetic from the kitchen to the living area often involves concealing the media console—cable boxes, game consoles, and streaming devices. However, sealing these heat-generating electronics inside a beautiful, solid-front cabinet is a recipe for disaster. Without proper ventilation, the trapped heat will drastically shorten the lifespan of your devices and cause performance issues like lagging and unexpected shutdowns. Achieving effective thermal management is non-negotiable.
The solution lies in creating an invisible pathway for air to circulate. This can be achieved through several methods. The simplest is passive ventilation. This involves designing the cabinet with discreet openings, such as a slotted or perforated back panel and a gap at the bottom (toe-kick area) to allow cool air to enter and a gap at the top to let hot air escape. For a more seamless look, cabinet doors can be made of materials that are somewhat permeable to air, like cane, rattan, or slatted wood, which also add textural interest.
For more powerful or densely packed electronics, active ventilation may be necessary. This involves installing ultra-quiet fans, specifically designed for AV cabinets, into the back or top of the unit. These fans can be wired to a thermal switch that activates them only when the internal temperature reaches a certain threshold, ensuring they run silently and only when needed. The key is to plan this ventilation from the very beginning of the design process, integrating it into the cabinet’s structure so that it remains completely hidden while keeping your valuable electronics cool and functional.
When to Avoid Handle-Less Cabinets if You Plan to Age in Place
The sleek, uninterrupted lines of handle-less cabinets are the hallmark of minimalist design. However, from the perspective of universal design and aging in place, they can present significant ergonomic challenges. While a healthy adult may find a push-to-open mechanism or a recessed edge pull perfectly usable, these designs can become difficult or even painful for someone with reduced hand strength, arthritis, or mobility impairments. This is a critical point of ergonomic foresight that must be considered in any “forever home” design.
Push-to-open mechanisms require a precise and firm push, which can be difficult for someone with limited dexterity. Edge pulls, while better, still require a degree of finger strength and a pincer-like grip to operate effectively. For long-term accessibility, traditional hardware often proves superior. A well-designed pull or knob provides a larger, more secure surface to grasp, requiring less fine motor skill and strength to open a heavy door or drawer.
This doesn’t mean you must sacrifice minimalist aesthetics. The market now offers a wide range of beautifully designed, modern handles that are also highly ergonomic. Look for D-shaped or C-shaped pulls with ample clearance between the pull and the cabinet face. These designs allow a user to loop their fingers—or even their whole hand—through the pull, making it easy to open without a tight grip. As KRC Alu Profiles notes, the choice is highly dependent on the user’s physical needs.
For individuals with mobility impairments or reduced hand strength, traditional handles may be easier to use than push-to-open mechanisms.
– KRC Alu Profiles, The Pros and Cons of Push-to-Open Hidden Kitchen Handles
How to Hide Hubs and Routers Without Blocking the Signal?
In a truly seamless home, even the humble Wi-Fi router and its blinking lights must disappear. However, hiding these devices is not as simple as placing them in any available cabinet. Wi-Fi signals are radio waves, and they can be significantly weakened or blocked by the wrong materials. The key to successful concealment is understanding the principle of signal transparency and choosing hiding spots and materials accordingly.
The worst materials for Wi-Fi signals are metal and dense, solid materials like concrete, plaster, and thick masonry. Hiding a router inside a metal filing cabinet or a thick-walled pantry is a guaranteed way to degrade your home’s connectivity. Water, including that in aquariums or even house plants, can also absorb and scatter signals. The best materials for signal transparency are wood, drywall, glass, and most plastics. Therefore, a wooden bookshelf, a media console made of MDF, or a dedicated niche within a drywall partition are all excellent hiding places.
When integrating a router into custom cabinetry, ensure the location is central to the home to provide the best coverage. The cabinet should also have some form of ventilation, as routers generate heat. A simple solution is a cabinet with a slatted or fabric-covered door, which is both aesthetically pleasing and permeable to Wi-Fi signals. For the ultimate integrated solution, consider mounting the router high up on a wall inside a decorative, non-metallic box or even in the attic or a closet, provided the construction materials do not impede the signal. By planning for signal transparency, you can achieve perfect connectivity without the visual clutter.
Do You Need Special Wiring for Tunable White LED Strips?
Integrated lighting is fundamental to minimalist design, and tunable white LED strips are a powerful tool for creating atmosphere. They allow you to change the color temperature of your light from a cool, energizing white during the day to a warm, relaxing glow in the evening. However, this advanced functionality requires a specific wiring setup that differs from standard single-color LED strips. Understanding this is crucial to avoid costly mistakes during renovation.
A standard, single-color LED strip requires a simple two-wire (or two-conductor) cable: one for power (+) and one for ground (-). A tunable white LED strip, however, has two different types of LED chips on it: one warm white and one cool white. To control these independently and mix their outputs to create different color temperatures, you need more conductors. The most common configuration requires a three-conductor wire: one for the warm white channel, one for the cool white channel, and a common positive conductor that powers both.
Therefore, if you plan to install tunable white lighting, you must ensure that your electrician runs the correct multi-conductor wire from the power supply/driver to the LED strip’s location. Trying to use standard two-conductor lamp wire will not work; you will only be able to power one of the color channels, defeating the entire purpose of the tunable system. While it’s not “special” in the sense of being exotic, it is a specific requirement that must be planned for. This attention to technical detail ensures your lighting system will function as designed, providing the seamless, mood-enhancing illumination your minimalist space deserves.
Key Takeaways
- Minimalist kitchen design is about engineering a frictionless living space, not just hiding appliances.
- Technical details like hardware durability, ventilation, and wiring are as important as aesthetics.
- True “visual silence” is achieved when the kitchen functions as seamlessly as it looks, merging perfectly with the living area.
How to Apply Minimalist Principles Beyond the Kitchen for a Cohesive Home?
The principles that guide the creation of a seamless, minimalist kitchen—visual silence, frictionless living, and invisible engineering—are not confined to one room. Applying these concepts throughout your home is the key to creating a truly cohesive and serene living environment. A home where technology is integrated but unseen, where storage is abundant but unobtrusive, and where every design choice serves both beauty and function.
Think about the transition from the kitchen to the living area. The same custom cabinetry that hides your refrigerator can extend to become a media unit, concealing the television behind retractable doors. The integrated lighting system can flow from under-cabinet task lighting to architectural cove lighting in the living room, all controlled by the same system. The choice of materials—the wood grain, the countertop stone, the hardware finish—can be repeated in subtle ways in other furniture or finishes, creating a unified visual language.
This holistic approach transforms your home from a collection of decorated rooms into a single, thoughtfully designed experience. It’s about solving the small, everyday frictions: the tangle of wires behind the desk, the clutter of coats by the door, the harsh overhead light in the bedroom. By applying the same rigorous attention to detail and focus on functional elegance, you can extend the tranquility of your minimalist kitchen to every corner of your home, creating a space that is truly a sanctuary from the outside world.
Begin applying these principles today to transform not just your kitchen, but your entire living experience into a seamless and serene environment.