The secret to a magical outdoor party isn’t the brightness of your lights, but the depth you create by designing in three distinct vertical layers.
- The human-height layer (table lanterns, wall sconces) is the most critical for creating intimacy and connection.
- Reliable low-voltage systems outperform solar for consistent, event-long brightness, especially in winter.
- Mastering color temperature (3000K) and smart controls transforms a simple yard into a dynamic, welcoming environment.
Recommendation: Stop thinking about individual fixtures and start orchestrating your space with a cohesive, three-layer lighting plan that guides mood from guest arrival to the last goodbye.
The scene is familiar: you’ve planned the perfect outdoor dinner party, the food is exquisite, the company delightful. Yet, the atmosphere is dictated by a single, harsh floodlight that either blinds your guests or plunges half the yard into impenetrable darkness. Many hosts try to solve this with a string of bistro lights, a few candles, and maybe some solar stakes along a path. While these are common starting points, they often fail to create a truly immersive and enchanting environment. They illuminate, but they don’t captivate. This approach addresses the basic need for light but ignores the art of crafting a mood.
The problem isn’t a lack of light; it’s a lack of thoughtful design. A truly memorable outdoor space is not just lit, it’s sculpted with light and shadow. But what if the key wasn’t simply adding more types of lights, but strategically placing them in distinct vertical layers? The real secret lies in moving beyond a flat, one-dimensional setup to an orchestrated experience that creates depth, warmth, and a sense of intimacy. It’s about understanding how light interacts with surfaces, how its color affects emotion, and how its control can adapt to the rhythm of your evening.
This guide will walk you through the professional approach to ambient lighting, focusing on a layered strategy. We will explore how to manage light to be a good neighbor, choose the right technology for reliability, and use advanced techniques like uplighting and color temperature to build an atmosphere that feels both magical and effortlessly safe. Prepare to transform your yard from a simply lit space into a captivating outdoor room.
To guide you through this transformation, we’ve structured this article to cover every critical aspect of outdoor lighting design, from technical choices to artistic principles. Explore the sections below to master the art of atmospheric lighting.
Summary: A Designer’s Guide to Outdoor Party Lighting
- How to Light Your Yard Without Annoying the Neighbors?
- Solar vs. Low-Voltage: Which Path Lighting Is More Reliable in Winter?
- Uplighting vs. Downlighting: Which Is Best for Textured Stone Walls?
- Why 3000K Is the Sweet Spot for Outdoor Ambient Warmth
- Smart Plugs or Dusk-to-Dawn Sensors: Which Saves More Energy?
- The Lighting Mistake That Flattens the Depth of an Eclectic Room
- Why Your Standard Pendant Light Looks Tiny in a High-Ceiling Hallway
- Where to Place Motion Sensors to Avoid False Alarms From Pets?
How to Light Your Yard Without Annoying the Neighbors?
The first principle of masterful outdoor lighting is consideration. Before you can create a beautiful atmosphere for your guests, you must ensure you’re not creating a nuisance for those living around you. Uncontrolled glare and light spilling into adjacent properties, known as “light trespass,” can ruin neighborly relations and is even recognized as a legal nuisance in many areas. The goal is to contain your light, creating an intimate bubble of warmth that respects boundaries. This isn’t about using less light, but about using smarter, more directed light.
Achieving this requires a conscious design strategy. It begins with fixture selection and ends with precise aiming. The most effective solutions involve physical modifications to the lights and thoughtful choices about their properties. By focusing light only where it’s needed—on your paths, your features, and your social spaces—you enhance your own experience while maintaining dark skies and peace for your neighbors.
Here are several key techniques to prevent light trespass and be a good lighting neighbor:
- Use glare shields or shrouds: These attachments are essential for focusing light downward and preventing horizontal spill.
- Choose warmer color temperatures: Lights in the 2700K-3000K range produce less perceived glare and are less disruptive to human and animal sleep cycles.
- Avoid over-lighting: Start with a “less is more” approach. A few tastefully placed fixtures are more elegant and less intrusive than a blanket of bright light. You can always add more if needed.
- Test from all angles: Before finalizing placement, view your lighting from the street, sidewalk, and as best you can, from your neighbor’s perspective to spot and correct any unintended glare.
- Set smart timers: Program your lights to turn off before a reasonable bedtime. Ambient party lighting doesn’t need to run all night.
- Aim lights downward: Prioritize downlighting over uplighting near property lines, and always ensure fixtures are pointed away from neighboring homes and windows.
Solar vs. Low-Voltage: Which Path Lighting Is More Reliable in Winter?
When planning for safety and ambiance along paths and stairways, hosts often face a choice between solar and low-voltage lighting. While solar offers easy, wire-free installation, its reliability for a social event, especially during winter’s shorter days, is highly questionable. The performance of solar lights is entirely dependent on receiving enough direct sunlight to charge, making them dim and short-lived on cloudy days or after an early sunset. For a dinner party that lasts hours, you need light that is consistent from the first guest’s arrival to the last one’s departure.
Low-voltage systems, which are powered by a transformer connected to your home’s electrical supply, offer unwavering reliability. They provide consistent brightness and color regardless of the weather or time of year. While the initial installation is more involved and costly, the long-term performance and control they offer are far superior for anyone serious about hosting. For instance, a professional analysis of landscape lighting shows the average solar path light emits a mere 1 lumen, while a standard 3-watt low-voltage LED fixture can produce 350-400 times that amount, ensuring both safety and beauty.
The following table, based on data from a comparative analysis of lighting systems, breaks down the key differences for a host planning an event.
| Feature | Solar Lighting | Low-Voltage Lighting |
|---|---|---|
| Reliability | Weather-dependent; dims on cloudy days or in winter | Consistent brightness in any weather condition |
| Event Duration Performance | May dim significantly during 4-6 hour dinner parties | Unwavering brightness from first to last guest |
| Lifespan | 2-5 years before noticeable performance decline | 10+ years with minimal upkeep |
| Control Options | Passive, set-and-forget with no control | Smart controls, timers, dimmers, full host authority |
| Installation Cost | $20-$50 per fixture, DIY-friendly | $250-$500+ professionally installed system |
| Battery Replacement | Every 1-3 years | Not applicable |
Uplighting vs. Downlighting: Which Is Best for Textured Stone Walls?
To add architectural drama to your outdoor space, lighting a textured surface like a stone wall can be a powerful move. The choice between uplighting (placing a fixture at the base pointing up) and downlighting (mounting a fixture high and pointing down) will produce dramatically different effects. While downlighting creates a soft wash, it tends to flatten texture. For a surface with rich character like stone, brick, or stucco, uplighting is unequivocally superior for creating depth and visual interest.
The magic of uplighting lies in its angle. By placing the light source low and close to the wall, the beam grazes the surface, catching every raised edge and casting long, dramatic shadows in every crevice. This technique, known as “grazing,” transforms a flat wall into a dynamic three-dimensional feature. It emphasizes the natural roughness and craftsmanship of the material, adding a layer of sophistication to your overall design. As one hardscape lighting expert from a retaining wall lighting design guide notes:
Uplighting provides dramatic texture highlights without touching the wall surface. The low angle of light creates shadows that make even subtle textures pop.
– Hardscape lighting expert, Retaining wall lighting design guide
This visual effect adds a crucial layer of texture to your outdoor “room,” preventing the background from feeling like a dark, empty void and contributing to the space’s perceived depth.
As you can see, this technique doesn’t just illuminate the wall; it brings it to life. The interplay of light and shadow creates a captivating backdrop for your dinner party, turning a simple structural element into a piece of art. This method is a cornerstone of professional landscape design for a reason: it delivers maximum impact with minimal fixtures.
Why 3000K Is the Sweet Spot for Outdoor Ambient Warmth
Beyond the placement and direction of your lights, their color has the single greatest impact on the mood of your space. Measured in Kelvin (K), color temperature determines whether light appears warm (yellowish) or cool (bluish). For an outdoor dinner party, the goal is to create an atmosphere that is welcoming, relaxing, and flattering to your guests. This is where the 3000K color temperature shines as the perfect balance. It provides a clean, soft white light that feels warm and inviting without being overly yellow like candlelight (around 1900K) or stark and sterile like cool white office lights (4000K+).
According to outdoor lighting design guidelines, 3000K is ideal for nighttime activities because it provides enough clarity to move around safely while cultivating a relaxed vibe that makes everyone feel welcome. It renders colors, food, and skin tones naturally, which is crucial for a social gathering. While 2700K is also an excellent warm choice, 3000K offers a slightly crisper look that pairs beautifully with both natural elements like greenery and modern architectural materials like concrete or steel.
Case Study: The Layered Kelvin Strategy
Professional designers often use a layered Kelvin strategy for a truly bespoke effect. As outlined in a guide on landscape lighting color temperature, this involves using slightly different temperatures for different layers of light. For example, use an even warmer 2700K as the foundational light for patios and decks, as it’s exceptionally flattering to skin tones and promotes a cozy, social atmosphere. Then, use 3000K to light architectural features on modern homes or cool-toned materials like gray slate, providing a clean, neutral highlight. This subtle variation adds a layer of professional polish that a single-color-temperature system cannot achieve.
Ultimately, selecting 3000K as your primary ambient temperature is a can’t-miss choice. It’s the industry standard for high-end hospitality for a reason: it strikes the perfect chord between comfortable warmth and functional clarity, ensuring your outdoor space feels both elegant and livable.
Smart Plugs or Dusk-to-Dawn Sensors: Which Saves More Energy?
Automating your outdoor lighting is key to both convenience and efficiency. The two most common tools for this are dusk-to-dawn sensors and smart plugs. A dusk-to-dawn sensor is a simple photocell that automatically turns lights on when the sun sets and off when it rises. While simple and effective for set-and-forget security lighting, it lacks the nuance required for hosting. It runs all night, wasting energy after your party is over, and offers no control over the mood.
Smart plugs, by contrast, offer superior control and, therefore, greater potential for energy savings. They transform any standard low-voltage system into a fully programmable one. By using a smartphone app, you can set precise schedules, use astronomical timers that adjust to the changing sunset times throughout the year, and, most importantly, create dynamic “scenes.” This level of control means your lights are only on when you need them and at the intensity you desire, drastically reducing wasted energy compared to an all-night sensor. For a dinner party, this ability to sculpt the atmosphere in real-time is a game-changer.
Action Plan: Creating Lighting Scenes for Your Party
- Program a ‘Guest Arrival’ scene: Set paths and entryways with brighter, welcoming light (around 100-150 lumens per square foot) to ensure safe passage.
- Create a ‘Dinner’ scene: As guests settle, transition to a softer, more intimate setting (40-100 lumens per square foot) in dining areas with warm 2700K-3000K tones.
- Set up a ‘Late Night Lounge’ scene: For after-dinner conversation, dim the lights further to create a low, moody atmosphere that encourages relaxation.
- Use astronomical timers: Have lights automatically turn on 15 minutes after sunset, allowing for a seamless transition from daylight to evening.
- Integrate color control: If using RGB fixtures, program calming hues for dinner and have the option to switch to more vibrant colors for a more festive mood later on.
While a dusk-to-dawn sensor is a passive tool, a smart plug is an active instrument of design. It empowers the host to be a true lighting director, saving energy not by simply turning off at dawn, but by using light precisely and purposefully throughout the event.
The Lighting Mistake That Flattens the Depth of an Eclectic Room
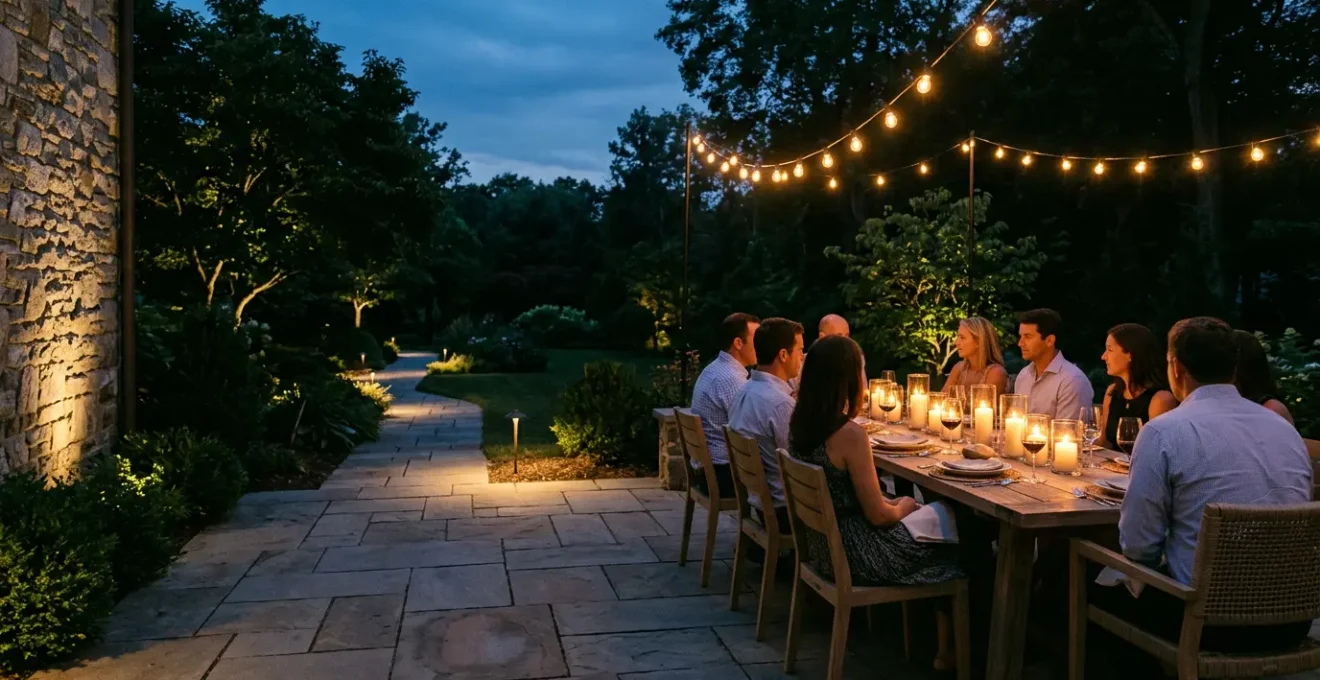
The single most common mistake in outdoor lighting is relying solely on overhead lights. Whether it’s a powerful floodlight or a charming web of string lights, a top-down-only approach creates a flat, two-dimensional effect. It illuminates the tops of heads and tables but leaves faces and the surrounding environment in shadow, failing to create a sense of intimacy or depth. This is the lighting equivalent of a bland, featureless room. To create a truly inviting and dynamic atmosphere, you must think in three vertical layers: high, middle, and low.
The high layer (overhead string lights, moonlighting from a tree) provides general, ambient illumination. The low layer (path lights, step lights) ensures safety and grounds the space. But the crucial, and most often neglected, layer is the middle or “human-height” layer. This is the light that exists at eye level, from roughly 3 to 6 feet high. This layer is created by sources like wall sconces, lanterns on tables or posts, and light washing over shrubbery. It’s the light that fills in shadows on faces, creates a warm glow for conversation, and makes the space feel like a true “room.”
Without this middle layer, your space will lack connection and depth. The high layer alone creates a “stage” effect, while the low layer is purely functional. The middle layer is what makes a space feel personal and enveloping. It bridges the gap between the sky and the ground, creating pockets of warm light that draw people in and encourage them to stay. As an Outdoor Lighting Style Guide puts it, “The desired effects are to make a space inviting, which is why most ambient lights cast a warm, diffused glow.” That inviting glow lives in the middle layer.
Why Your Standard Pendant Light Looks Tiny in a High-Ceiling Hallway
Just as a tiny rug looks lost in a large living room, undersized light fixtures can completely disappear in the vastness of an outdoor setting. The sky is the ultimate high ceiling, and a common mistake is choosing fixtures that are scaled for indoor rooms. A standard pendant that looks perfect over a kitchen island will look comically small and insignificant when hung from a pergola or a high tree branch. Proper scale is essential to creating a sense of place and ensuring your lighting design feels intentional and anchored, not random and lost.
In outdoor spaces, you almost always need to size up. For large patios or decks, think about “anchoring” the space with a substantial fixture. This could be an oversized outdoor chandelier, a cluster of multiple pendants hung at varying heights to create a single large mass, or even large-bulb (G50) string lights that have more visual weight than delicate fairy lights. For landscape features, a single small uplight on a majestic oak tree will look pathetic; it needs multiple, more powerful fixtures with wider beam angles to properly “paint” the entire canopy and honor its grandeur.
Here’s how to create proper scale in your outdoor lighting design:
- Use oversized fixtures: Don’t be afraid of large outdoor chandeliers or pendants to anchor a seating or dining area.
- Cluster smaller lights: Hang multiple pendants or lanterns together at different heights to create the visual impact of one large fixture.
- Create a ‘room within a room’: Use a large, low-hung cluster of lights over a dining table to create an intimate “ceiling,” visually separating it from the wider open space.
- Match scale to features: For large trees, use several powerful uplights. For long pergolas, use a long linear pendant or run substantial Edison-bulb strings down its length.
- Fill vertical space: Use crisscrossing string lights or lights run between tall poles to match the grand proportions of an open yard.
By respecting the scale of the outdoors, your lighting will not only be more effective but will also contribute to a cohesive and professionally designed aesthetic.
Key takeaways
- The most effective outdoor lighting is layered vertically: a low layer for safety, a high layer for ambiance, and a crucial middle layer for intimacy.
- Low-voltage systems provide the reliability and control necessary for hosting events, far surpassing weather-dependent solar options.
- Strategic choices in color temperature (3000K), fixture scale, and directional control (uplighting, shields) are what separate amateur from professional design.
Where to Place Motion Sensors to Avoid False Alarms From Pets?
While excellent for security, motion-activated floodlights are the sworn enemy of a carefully crafted dinner party atmosphere. A sudden, cold blast of high-lumen light is the fastest way to shatter an intimate mood, startle guests, and undo all your design work. The common issue of false alarms from pets or swaying branches is secondary to the main problem for a host: reactive lighting is disruptive by nature. The goal of ambient design is proactive, not reactive, safety and mood.
Therefore, the best placement strategy for motion sensors during a party is to disable them entirely in or near your main social areas. A well-designed layered lighting plan, with a constant but low level of light on paths and steps (40-100 lumens per square foot), provides “proactive safety” without any jarring changes. Guests’ eyes remain adjusted, and the mood stays consistent. Motion sensors should be relegated exclusively to purely utilitarian, out-of-sight zones, like the path to the garbage cans or a back gate, with their detection range carefully aimed to prevent bleed into the party zone.
Think of light as a subtle “herding” tool. By keeping primary paths and social zones beautifully and consistently lit, while leaving other areas in strategic darkness, you naturally guide guests where you want them to be. This is a far more elegant solution than a motion sensor that effectively shouts “Someone is here!” with a blast of light. For a dinner party, your ambient lighting is your safety lighting.
To preserve your party’s ambiance, follow this strategic approach to motion sensors:
- Disable them completely: Turn off any motion-activated security lights in or near your patio, deck, and main yard during the event.
- Relegate to utilitarian zones: Use them only for out-of-the-way areas guests won’t frequent, ensuring the sensor beam is tightly focused.
- Prioritize proactive safety: Use always-on, low-level layered lighting on all paths and steps instead of reactive motion lights.
- Use light to guide guests: Keep social zones and main pathways invitingly lit, leaving non-essential areas dark to naturally direct foot traffic.
By moving beyond a simple on/off mentality and embracing your role as a lighting designer, you can craft an outdoor experience that is safe, functional, and truly unforgettable. The next step is to begin assessing your own space through this new lens of layered, intentional design.