The key to a cooler patio isn’t adding fans, but mastering the science of thermal management by strategically manipulating your environment’s physics.
- Shade from trees and structures provides cooling far beyond simple sun blocking through processes like evapotranspiration.
- Material choice is critical; high Solar Reflectance Index (SRI) surfaces like light-colored pavers actively repel heat, unlike heat-absorbing concrete or dark decking.
Recommendation: Begin by analyzing your patio’s sun exposure and surface materials, as these two factors offer the greatest potential for passive temperature reduction.
The dream of a perfect summer afternoon on the patio often clashes with the reality of blistering heat, driving homeowners indoors to the hum of an air conditioner. The common response is to install outdoor fans or misting systems, treating the symptom rather than the cause. These solutions, while offering temporary relief, consume energy and often fail to address the fundamental reason your outdoor space is uncomfortable: uncontrolled thermal gain. Your patio isn’t just hot because the air is hot; it’s actively absorbing and radiating solar energy, creating a localized heat island effect right outside your door.
Most advice stops at “buy an umbrella” or “plant a tree,” failing to explain the powerful physics at play. The truth is, cooling an outdoor space is an exercise in applied thermodynamics. It involves managing solar radiation, encouraging convective cooling through airflow, and understanding the thermal properties of materials. By shifting focus from active cooling devices to passive design strategies, you can fundamentally alter your patio’s microclimate, making it a comfortable oasis even during peak heat. This isn’t about fighting the sun; it’s about intelligently working with its energy.
This article moves beyond generic tips to provide a specialist’s perspective on thermal comfort. We will deconstruct the science of outdoor heat and provide a blueprint for engineering a cooler patio. We will explore how strategic tree placement leverages natural air conditioning, why the specific material of your patio floor matters more than its color alone, how to turn privacy screens into airflow accelerators, and how to optimize every element of your outdoor space to work in concert against the heat. The goal is to achieve a significant, measurable drop in temperature without plugging anything in.
This guide breaks down the essential strategies for passive patio cooling. Each section provides a scientific yet practical approach to transforming your hot slab of concrete into a comfortable and usable outdoor living area. Discover the principles that will allow you to reclaim your summer.
Summary: A Scientific Guide to Passive Patio Cooling
- Where to Place Trees to Maximize Cooling Shade on Your House?
- Concrete vs. Pavers: Which Retains Less Heat in Direct Sunlight?
- How to Position Privacy Screens to Encourage Airflow on a Porch?
- Evaporative Cooling: How a Mist System Can Save Your Summer BBQ?
- Why Dark Decking Colors Are a Mistake in Southern Climates
- 1%, 3%, or 5%: Which Solar Shade Opacity Preserves the View?
- North vs. South: Which Way Should Pergola Louvers Run for Max Shade?
- Smart Thermostat ROI: How Long to Recoup the $250 Investment?
Where to Place Trees to Maximize Cooling Shade on Your House?
Strategic tree placement is the most effective passive cooling method, acting as a biological air conditioner. The benefit extends far beyond simple shade. The primary mechanism is a process called evapotranspiration, where a tree pulls water from the ground and releases it as cool vapor through its leaves. This process actively removes heat from the air, creating a significantly cooler microclimate. In fact, research from Berkeley Lab demonstrates that a single healthy tree can transpire over 100 gallons of water per day, providing a cooling effect equivalent to five standard air conditioners running for 20 hours. Global meta-analyses confirm that urban trees can lower pedestrian-level temperatures by as much as 12°C (21.6°F).
To maximize this effect, placement is everything. The goal is to block the most intense solar radiation before it hits your home’s walls and your patio surface. In the Northern Hemisphere, the most critical areas to shade are the west and southwest exposures. These receive the harsh, low-angle afternoon sun that heats thermal mass most effectively. Planting deciduous trees (which lose their leaves in winter) in these locations provides dense shade in the summer while allowing passive solar gain to warm your home in the winter, reducing year-round energy costs.
For immediate patio cooling, consider the sun’s path throughout the day. A tree placed directly to the south will provide high-noon shade, but a tree to the west is more valuable for making late afternoons and evenings comfortable. Planting a small cluster of trees is more effective than a single tree, as it creates a larger, more stable zone of cool, humid air. The key is to position them to intercept the sun’s rays at the hottest times of the day, creating a shield of living, breathing air conditioning that cools both the air and the ground below.
Concrete vs. Pavers: Which Retains Less Heat in Direct Sunlight?
The material your patio is made from is one of the single most important factors determining its temperature. Dark, dense materials like standard concrete and asphalt act as massive thermal batteries, absorbing solar radiation all day and continuing to radiate that heat long into the evening. This phenomenon is quantified by a material’s Solar Reflectance Index (SRI), a scale from 0 to 100 that measures a surface’s ability to reflect solar heat. A material with an SRI of 0 (like new, black asphalt) absorbs almost all solar energy, while a material with an SRI of 100 is highly reflective. For context, white Portland cement concrete can achieve an SRI of 86-100, making it dramatically cooler than its standard grey counterpart (SRI of ~35).
This isn’t a minor difference. Studies show that conventional dark pavements can be 68-86°F (20-30°C) hotter than the surrounding air. Choosing a material with a high SRI is a direct intervention. Concrete pavers offer a significant advantage over a monolithic poured concrete slab. First, they are available in a wide range of lighter colors and finishes that naturally have a higher SRI. Second, the joints between pavers break up the thermal mass, allowing for some air and moisture circulation which aids in cooling. Permeable pavers take this a step further, allowing water to infiltrate the surface and cool the area through evaporation, actively fighting heat buildup.
As the following comparison shows, material and color choice have a direct and measurable impact on surface temperature. This data, based on analysis of various paving materials, highlights the penalty for choosing dark surfaces.
| Material Type | Color/Finish | Solar Reflectance Index (SRI) | Temperature Performance vs. Standard Grey Concrete |
|---|---|---|---|
| New Asphalt | Dark (standard) | 0 | Baseline hottest surface |
| Aged Asphalt | Weathered grey | 10-15 | — |
| Standard Grey Concrete | Medium-light grey | 35 | Reference (0%) |
| White Portland Cement Concrete | White/light cream | 86-100 | Significantly cooler |
| Concrete Pavers (Graphite Charcoal) | Dark | 5 | +10-22% hotter |
| Concrete Pavers (Platinum Grey) | Medium | 30 | Similar to standard concrete |
| Concrete Pavers (Latte Brown) | Light tan | 34 | Similar to standard concrete |
| Light Porcelain Pavers | White/cream/light grey | Variable (high) | 5-20% cooler than concrete |
| Permeable Pavers (light color) | Light with gaps | Variable | Actively cooler (evaporative effect) |
Ultimately, when selecting a patio surface for a hot climate, prioritize a high SRI. Light-colored pavers, especially porcelain or permeable options, will remain significantly more comfortable underfoot and radiate far less heat into your outdoor living space compared to a standard poured concrete slab.
How to Position Privacy Screens to Encourage Airflow on a Porch?
Privacy screens are often installed with a single purpose in mind: blocking a neighbor’s view. However, a solid wall can inadvertently create a stagnant, hot air pocket by obstructing natural breezes. With strategic positioning and material selection, you can achieve privacy while simultaneously enhancing airflow through a principle known as the Venturi effect. This effect states that when a fluid (like air) is forced through a constricted channel, its velocity increases. By creating a funnel, you can turn a gentle breeze into a focused, cooling current.
Instead of a single, long, solid screen parallel to your house, consider using two or more angled panels. Position them to capture the prevailing wind and channel it across your porch. For example, if the breeze typically comes from the southwest, orient the screens to create a funnel that narrows towards your main seating area. This not only directs the airflow where you want it but also speeds it up, maximizing its cooling potential. The key is to work with your site’s natural wind patterns, not against them.
The material of the screen is equally important. A solid, non-porous material will block wind entirely. Instead, opt for materials with a degree of permeability. Louvered screens are an excellent choice, as they can be angled to block the sun and provide privacy while still allowing air to pass through. Screens made from perforated metal or even certain types of outdoor-rated fabric can also break up the wind without stopping it, reducing its force while maintaining circulation. The goal is to find the balance between visual obstruction and air permeability.
Action Plan: Auditing Your Porch for Airflow Potential
- Observe Prevailing Winds: Spend a few days noting the primary direction and time of day you receive breezes. A small ribbon tied to a post can be a simple wind indicator.
- Map Your Airflow Path: Sketch your porch and mark the desired path for air to travel, typically from the windward side across the main seating or activity area and out the other side.
- Identify Obstructions: Note any existing solid walls, dense shrubbery, or structures that are currently blocking this desired path.
- Assess Screen Permeability: If you have existing screens, evaluate their porosity. Can air pass through them? If not, they are part of the problem.
- Plan Funnel Placement: Based on your airflow map, determine where you could place angled or permeable screens to create a Venturi-like funnel that directs and accelerates the breeze.
By treating privacy screens as an active component of your porch’s climate system, you can transform them from a potential heat trap into a sophisticated tool for enhancing natural ventilation and comfort.
Evaporative Cooling: How a Mist System Can Save Your Summer BBQ?
Evaporative cooling is a powerful thermodynamic principle where the phase transition of water from liquid to gas absorbs a significant amount of heat energy from the surrounding air. A misting system atomizes water into a fog of ultra-fine droplets. As these droplets evaporate, they cause a “flash cooling” effect, instantly lowering the ambient temperature. When deployed correctly, high-pressure systems can reduce the ambient temperature by up to 30°F, turning an unbearable space into a pleasant retreat. This can be the difference between canceling a summer barbecue and enjoying it in comfort.
However, the effectiveness of any evaporative cooling system is critically dependent on one variable: relative humidity. In hot, dry (arid) climates like those in Arizona or inland California, the air has a large capacity to absorb moisture, allowing for rapid evaporation and a dramatic temperature drop. In contrast, in hot, humid (subtropical or tropical) climates like Florida or Houston, the air is already near its saturation point. The mist droplets cannot evaporate efficiently and instead simply condense on surfaces, making the area feel damp and clammy with only a negligible decrease in temperature.
Therefore, a misting system is not a universally effective solution. It is a geographically specific tool. Before investing, it’s crucial to understand your local climate’s average summer humidity. High-pressure systems (operating at 1000+ PSI) create a much finer mist that evaporates more quickly, making them more effective in moderately humid conditions than low-pressure systems that attach to a garden hose. The table below outlines what to expect based on your climate.
| Climate Type | Relative Humidity Range | Expected Temperature Drop | Effectiveness Rating | Example Locations |
|---|---|---|---|---|
| Hot & Dry (Arid) | 10-30% | 20-30°F (11-17°C) | Highly Effective | Phoenix AZ, Las Vegas NV, Palm Springs CA |
| Hot & Moderate | 30-50% | 10-20°F (6-11°C) | Effective | Inland California, parts of Texas |
| Hot & Humid (Subtropical) | 60-80% | 2-5°F (1-3°C) | Minimally Effective | Miami FL, Houston TX, coastal regions |
| Hot & Very Humid (Tropical) | 80%+ | 0-2°F (0-1°C) | Not Recommended | Coastal tropical zones |
| Note: High-pressure misting systems (1000+ PSI) perform better in all conditions compared to low-pressure systems. Temperature drops based on ambient conditions and proper system sizing. | ||||
For those in the right climate, a misting system can be a game-changer. For those in humid regions, investing in one will likely lead to disappointment and a wet patio. In such cases, focusing on shade and airflow strategies is a far more effective use of resources.
Why Dark Decking Colors Are a Mistake in Southern Climates
In southern climates where intense, prolonged sun exposure is the norm, the color of your decking material is not just an aesthetic choice—it’s a critical decision for both comfort and safety. Dark-colored materials, whether they are wood stain, paint, or the pigment in composite decking, have a very low albedo (reflectivity) and a correspondingly low Solar Reflectance Index (SRI). This means they absorb a huge percentage of the solar energy that strikes them, converting it into heat. A dark brown or charcoal grey deck can easily reach surface temperatures that are dangerously hot to the touch.
This heat buildup has two major negative consequences. First, it makes the deck unusable for much of the day. Walking barefoot becomes impossible, and the area is uncomfortable even for those wearing shoes. Second, the intensely hot deck acts as a massive radiator, continuously releasing heat into the air above it and into the space beneath it. This not only makes the deck itself hotter but also raises the ambient temperature of your entire patio area and can even increase the cooling load on your house if the deck is attached.
The safety issue cannot be overstated. While discomfort is a given, actual burn risk is a real possibility, especially for children or pets. According to safety guidelines, prolonged contact with surfaces above 120°F (49°C) is uncomfortable, and surfaces over 130°F (54°C) can cause first-degree burns. Dark composite or painted decks in direct southern sun can easily exceed 150°F (65°C), making them a legitimate hazard. Lighter colors like tan, light grey, or natural wood tones reflect significantly more solar radiation, keeping their surface temperatures much closer to the ambient air temperature and ensuring the space remains both safe and usable.
1%, 3%, or 5%: Which Solar Shade Opacity Preserves the View?
Exterior solar shades are a highly effective way to block solar heat before it ever reaches your patio or windows. They work by absorbing and reflecting a percentage of solar energy, but their performance is a delicate balance between heat control, glare reduction, and preserving the outdoor view. This balance is defined by the shade’s “openness factor” or opacity, typically expressed as a percentage like 1%, 3%, or 5%. This number represents the percentage of the fabric’s surface area that is open, allowing light and vision to pass through.
Choosing the right opacity is a trade-off. Here’s how to think about it:
- 1% Openness: This is the most protective option. It blocks approximately 99% of UV rays and provides the best heat and glare control. However, it is also the most opaque. During the day, you will be able to see out, but the view will be noticeably muted and less detailed. At night, with interior lights on, it offers the most privacy. This is the best choice for west-facing windows or patios that receive extreme, direct sun.
- 5% Openness: This is a popular choice for preserving the view. It blocks about 95% of UV rays, still offering excellent heat and glare reduction, but the looser weave allows for much greater clarity when looking outside. It feels more open and less obstructive. The trade-off is slightly less heat control and reduced nighttime privacy. This is ideal for north or east-facing exposures or any area where the view is a top priority.
- 3% Openness: This option offers a compromise between the two extremes. It provides a clearer view than a 1% shade while offering better heat and glare control than a 5% shade. It’s an excellent all-around choice for many applications, balancing protection with visibility effectively.
The color of the shade fabric also plays a crucial role. A dark-colored fabric (like charcoal or bronze) will absorb more heat but provide a much clearer, crisper view-through with less glare. A light-colored fabric (like white or beige) will reflect more heat, making it more energy-efficient, but it will diffuse light and can create more glare, making the view appear more hazy or washed out. For the best view, a dark, low-opacity fabric (like a 3% or 5% charcoal) is often the superior choice.
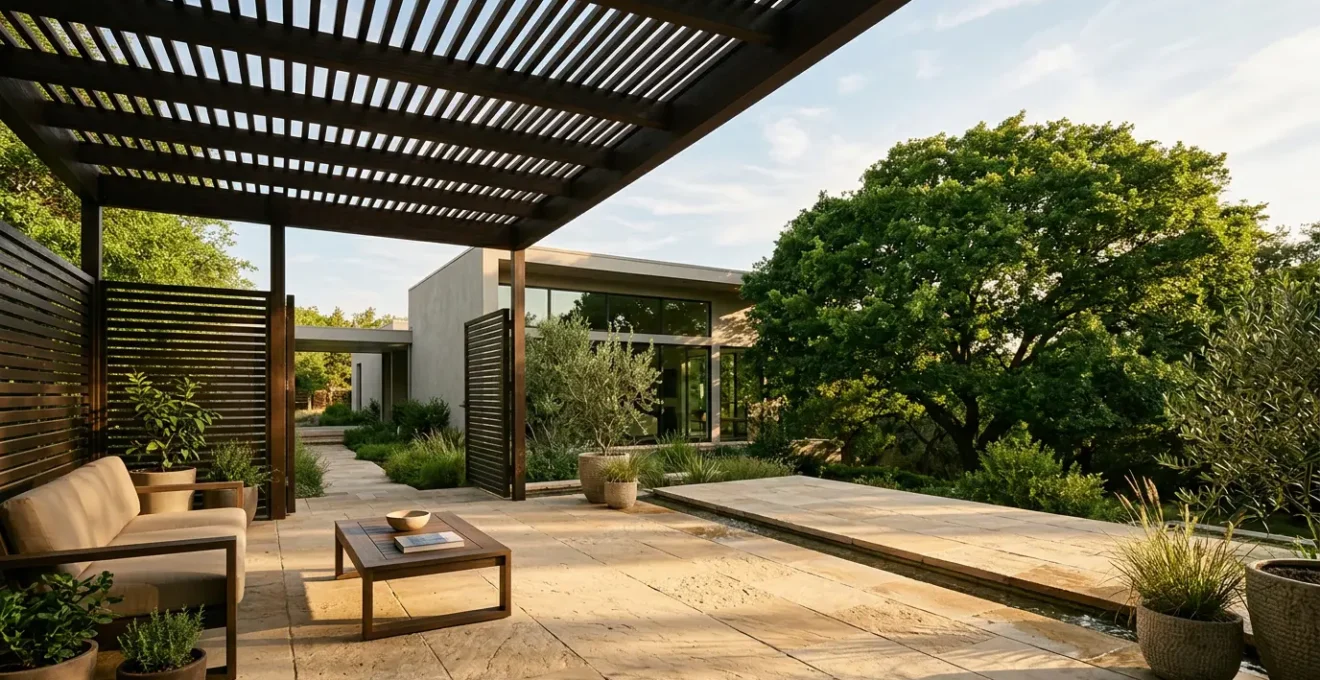
North vs. South: Which Way Should Pergola Louvers Run for Max Shade?
A louvered pergola offers the ultimate in controllable shade, but its effectiveness is entirely dependent on the orientation of the louvers relative to the sun’s path. This is a common point of confusion and error in installation. The optimal orientation depends on your primary goal: all-day shade control or maximizing morning/afternoon sun. For most homeowners seeking to create a cool daytime retreat, the goal is maximum shade, and there is a clear, correct answer.
To achieve the best all-day shade control, the louvers themselves should run in a North-South direction. This may seem counterintuitive, but it’s based on the sun’s path across the sky. The sun rises in the east and sets in the west. By orienting the louvers North-South, the long edges of the slats are perpendicular to the sun’s path for the majority of the day. This allows you to precisely tilt the louvers to block the sun’s rays as it moves across the sky—from the low-angle morning sun in the east, to high-noon sun directly overhead, to the intense afternoon sun in the west.
If the louvers were to run East-West, they would be parallel to the sun’s path. In the morning and evening, the low-angle sun would stream in through the gaps between the slats, regardless of their tilt. You would only be able to achieve full shade when the sun is high in the sky around midday. This orientation is only preferable if your goal is to maximize morning and evening sun while only blocking the high-noon sun.
Therefore, for a patio space intended to be a cool escape from the summer sun, the rule is simple: the moving slats of the pergola must run from North to South. This gives you full control to track and block the sun at any time of day, ensuring your space remains a comfortable, shaded haven from dawn until dusk.
Key Takeaways
- Strategic placement of deciduous trees on west/southwest exposures provides active cooling via evapotranspiration, going far beyond simple shade.
- Material choice is paramount; light-colored pavers with a high Solar Reflectance Index (SRI) actively reject heat, while dark concrete and decking absorb and radiate it.
- The effectiveness of cooling technologies like misting systems is critically dependent on local humidity, making them ideal for dry climates but ineffective in humid ones.
Smart Thermostat ROI: How Long to Recoup the $250 Investment?
When considering the return on investment for a “smart thermostat,” it’s tempting to think only of the $250 programmable device on your wall. However, the most powerful smart thermostat is not a piece of technology—it’s the integrated design of your home’s passive cooling systems, controlled by you. The true “investment” is the cost of planting trees, choosing reflective pavers, or installing retractable awnings. The “return” is a dramatic and permanent reduction in your reliance on energy-intensive air conditioning. The payback period for these investments is often faster than you might think.
Let’s reframe the ROI calculation. The initial investment isn’t just a one-time purchase, but a series of strategic upgrades. For example:
- Strategic Shading: Installing a retractable awning can reduce the temperature on a patio by as much as 20°F. This prevents a massive amount of heat from ever reaching your home’s windows and walls, directly lowering the workload on your AC unit.
- Reflective Surfaces: Upgrading from a dark concrete patio to light-colored pavers can reduce surface temperatures by up to 30°F. This eliminates a huge radiant heat source adjacent to your home.
Each of these interventions systematically reduces the “heat load”—the amount of energy your AC must expend to maintain a comfortable indoor temperature. A cooler exterior environment translates directly to lower energy bills.
The financial return is measured in kilowatt-hours saved. By significantly cooling the immediate exterior of your home, you can reduce AC runtime by several hours per day during peak season. Depending on your local electricity rates, this can easily equate to savings of $50-$100 per month or more during the summer. An investment in a few well-placed trees or a high-quality awning can therefore pay for itself in just a few seasons, after which it continues to provide savings for decades. This ROI far surpasses that of a simple programmable thermostat, which can only optimize an already high energy demand. The truly smart approach is to reduce that demand at its source.
By implementing these science-based strategies, you can take control of your home’s thermal environment, creating a comfortable outdoor space and realizing significant energy savings in the process. Start by evaluating your patio’s biggest heat sources and plan your interventions for the greatest impact.