The persistent red dust from your exposed brick isn’t just a cleaning issue; it’s a sign of surface deterioration that generic sealers can worsen by trapping moisture.
- Effective sealing requires a “breathable” penetrating sealer (like a silane/siloxane) that consolidates the brick from within, not a film-forming acrylic that creates a non-permeable surface.
- Proper substrate analysis and cleaning are critical first steps to ensure the sealer adheres correctly and prevents issues like efflorescence.
Recommendation: Prioritize material preservation over a quick fix. Choose a high-quality, vapor-permeable penetrating sealer and test it on a small, inconspicuous area first to verify the final finish and color effect.
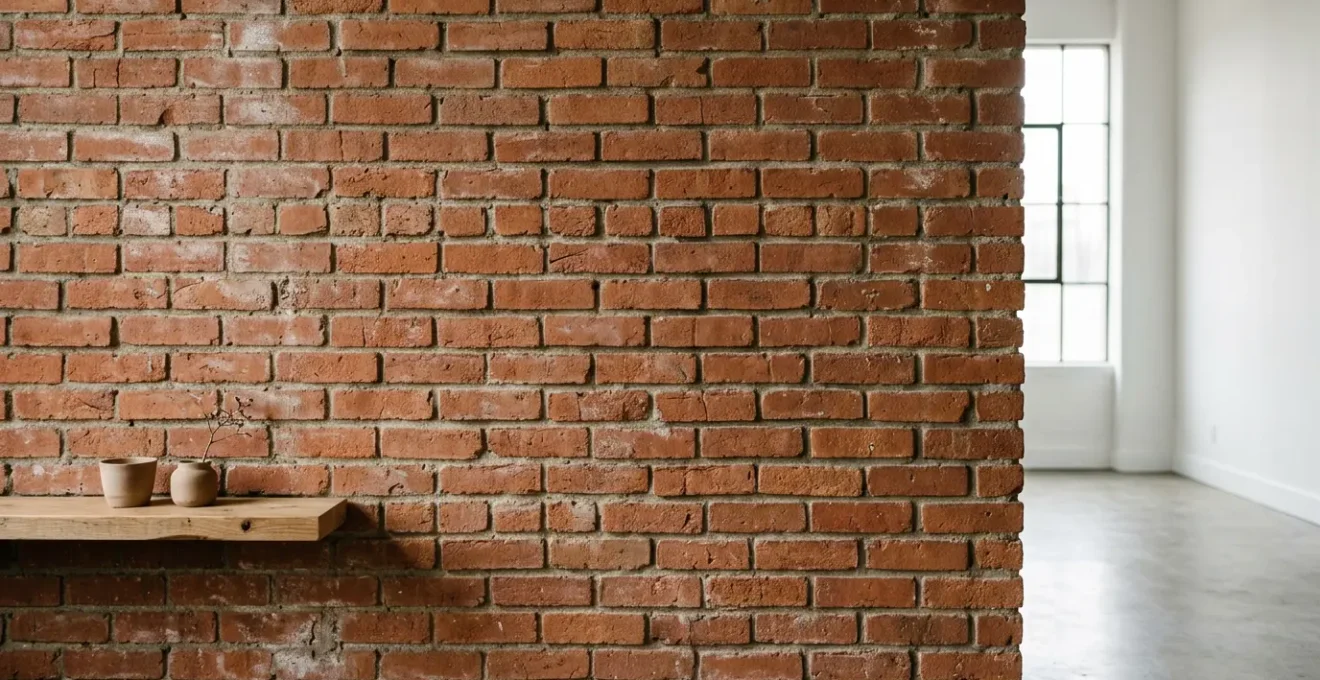
The allure of an exposed brick wall is its celebration of structural honesty—a raw, industrial texture that brings character to any loft or home. However, that charm often comes with a persistent and frustrating problem: a fine, reddish-brown dust that settles on floors, baseboards, and furniture. This isn’t just dirt; it’s the physical evidence of your brick and mortar slowly breaking down. The common advice is to simply apply a “brick sealer,” but this approach is often a superficial fix that can lead to more significant, long-term damage. Many loft owners reach for off-the-shelf acrylics, inadvertently trapping moisture within the masonry, which can accelerate spalling and decay, especially in older buildings.
Treating this issue is not merely about decoration or cleaning; it’s an act of material preservation. The key is not to create an impenetrable plastic-like film over the surface, but to consolidate the friable material and arrest the dusting process while allowing the wall to “breathe.” This requires a more technical understanding of the substrate—the brick and mortar itself—and the chemical differences between sealer types. Before you even consider a product, a proper diagnosis of your wall’s condition, porosity, and cleaning needs is paramount. This guide moves beyond the generic advice to provide a maintenance-oriented framework for properly sealing your interior brick, ensuring you stop the dust for good while protecting the integrity and value of your architectural feature.
This article provides a comprehensive, technical overview of managing and preserving your exposed brick walls. From foundational decisions about finishes to the critical science of insulation and lighting, you will find the expert guidance needed to properly care for this unique feature.
Summary: A Technical Guide to Exposed Brick Wall Preservation and Enhancement
- To Paint or Not to Paint: Will Painting Brick Lower My Resale Value?
- How to Drill Into Brick Without Cracking the Mortar?
- Why Grazing Light Is the Best Way to Highlight Brick Texture
- How to Clean a Brick Fireplace That Has 50 Years of Soot Buildup?
- The Insulation Problem: How to Keep a Brick House Warm Without Covering the Brick?
- Windows or Insulation: Which Upgrade Lowers Your Footprint Faster?
- Uplighting vs. Downlighting: Which Is Best for Textured Stone Walls?
- How to Mix Metal Finishes in Lighting Without Clashing?
To Paint or Not to Paint: Will Painting Brick Lower My Resale Value?
The temptation to paint over aging or discolored brick can be strong, often seen as a quick way to modernize a space. However, from a material preservation and property value standpoint, this is an irreversible decision that should be approached with extreme caution. Natural brick is a desirable architectural feature, and covering it with paint permanently hides its texture, color variations, and historic character. Real estate market analysis confirms this, showing that homes with their original brick exteriors can command an at least 6% higher resale value than homes clad in other materials like vinyl or stucco. Painting effectively negates this premium.
Beyond aesthetics, paint creates a non-permeable film on the brick’s surface. Brick is a porous material that needs to breathe—meaning it must be able to absorb and release moisture vapor. Trapping this moisture behind a layer of paint can lead to spalling, where the face of the brick flakes off, and can accelerate the deterioration of the mortar. As Masie O’Toole, a design expert, notes, the permanence of this choice is its biggest drawback.
Paint is permanent, and once you commit to your project, there’s no way to bring the brick back to its natural tone.
– Masie O’Toole, House Digest
If you are looking to stop dust or unify the wall’s appearance, a penetrating masonry sealer is a far superior choice. A high-quality silane/siloxane sealer will consolidate the surface to stop crumbling without forming a film, preserving both the brick’s appearance and its vital vapor permeability. This approach protects your investment rather than covering it up.
How to Drill Into Brick Without Cracking the Mortar?
Mounting shelves, art, or fixtures onto an exposed brick wall requires a precise technique to avoid causing structural damage. The primary risks are cracking the face of the brick or, more commonly, shattering the surrounding mortar, which is significantly softer and more brittle. Unlike drilling into drywall, brute force is your enemy; a controlled, methodical approach using the right tools is essential for a clean and secure anchor point. The key is to use a hammer drill with a specialized masonry bit. A standard drill lacks the percussive action needed to efficiently pulverize the masonry, leading to overheating and bit failure.
The location of the hole is just as important as the tool used. Always aim for the center of a brick rather than the mortar joints. Brick provides a much stronger and more reliable hold for anchors. Drilling into mortar can not only compromise the anchor’s holding power but also destabilize the bricks it supports. Furthermore, stay well away from the edges of the brick, as drilling too close can cause the corner or edge to spall or fracture. A proper pilot hole is another non-negotiable step; it guides the larger bit and reduces the pressure needed, minimizing the risk of a blowout on the back side of the wall.
Action Plan: Drilling Into Brick Safely
- Mark and Prepare: Mark your drilling spot on the face of the brick, ensuring it is at least 1 inch away from any edge to prevent splitting. Place a piece of masking tape over the mark to prevent the drill bit from “walking.”
- Drill a Pilot Hole: Attach a small-diameter masonry drill bit (e.g., 1/8 inch) to your hammer drill. Drill a shallow pilot hole at the marked spot to guide the final bit.
- Maintain Perpendicularity: Hold the drill perfectly perpendicular (90 degrees) to the wall. Apply steady, firm pressure, letting the hammer action of the drill do the work. Avoid forcing the bit.
- Drill the Final Hole: Switch to the masonry bit that matches the diameter required for your anchor. Drill slowly and steadily until you reach the desired depth. Periodically pull the bit out to clear dust.
- Clean and Anchor: Use compressed air or a small vacuum nozzle to thoroughly clear all brick dust from the hole. This ensures the anchor can expand properly for a secure grip. Insert your anchor and fixture.
By following these steps, you can confidently install items on your brick wall, preserving its structural integrity while adding functionality to your space.
Why Grazing Light Is the Best Way to Highlight Brick Texture
Lighting an exposed brick wall is not just about illumination; it’s about revealing its soul. The inherent beauty of brick lies in its texture—the subtle roughness of the clay, the variations in color, and the deep recesses of the mortar joints. Flat, direct lighting from the front washes these details out, making the wall appear one-dimensional and dull. To truly celebrate this texture, the most effective technique is grazing light. This involves placing a light source very close to the wall, either on the floor (uplighting) or the ceiling (downlighting), and aiming the beam parallel to the surface.
This sharp angle of light rakes across the brick faces, casting long, dramatic shadows in every indentation, pit, and mortar joint. These shadows are what create the powerful sense of depth and three-dimensionality. The rougher the brick, the more dramatic the effect will be. This technique transforms the wall from a simple surface into a dynamic art piece, where the interplay of light and shadow changes depending on your viewing angle and the time of day. It is the single most powerful tool for enhancing the industrial and historic character of the material.
As you can see in the detail above, grazing light turns every small imperfection into a feature. For this effect, track lighting with adjustable heads, recessed wall washers, or linear floor-mounted fixtures are ideal. When selecting bulbs, a warm color temperature (2700K-3000K) is generally preferred, as it enhances the natural red and brown tones of the brick, creating a cozy and inviting atmosphere. A higher color rendering index (CRI) of 90+ will also ensure the natural color variations in the brick are rendered accurately and vibrantly.
How to Clean a Brick Fireplace That Has 50 Years of Soot Buildup?
Cleaning a brick fireplace with decades of accumulated soot is a challenging restoration task, not a simple housekeeping chore. Heavy soot deposits are greasy, acidic, and deeply embedded in the porous brick and mortar. Aggressive cleaning methods, like sandblasting or acid washing with muriatic acid, are strictly off-limits for interior use; they are overly destructive, create massive amounts of airborne dust (including potentially harmful silica), and can permanently damage the brick face and mortar joints. A methodical, chemical-based approach is required to break down the soot without harming the masonry.
Your first step is mechanical removal. Use a stiff-bristled (non-wire) brush and a heavy-duty shop vacuum to remove all loose soot and debris. Work from the top down. This initial pass is critical as it prevents you from turning loose soot into a slurry when you introduce liquids. For the deep cleaning, a solution of Trisodium Phosphate (TSP) is a highly effective and traditional degreaser for heavy soot. Mix about a half-cup of TSP into a gallon of hot water, adding a squirt of liquid dish soap to help lift the grease. Always wear heavy-duty rubber gloves, eye protection, and ensure the area is well-ventilated, as TSP is a powerful alkaline cleaner.
Using a sponge or brush, apply the TSP solution to a small, manageable section of the brick. Let it sit for 5-10 minutes to dissolve the soot, but do not let it dry on the surface. Then, scrub the area with your stiff brush, working the solution into the mortar joints. The real secret to success is in the rinsing. You must thoroughly rinse the cleaned section with a separate bucket of clean water and a clean sponge, changing the rinse water frequently. Any leftover TSP residue can lead to white, powdery efflorescence as the wall dries. Work in small sections, from top to bottom, overlapping each section to avoid streaks. For extremely stubborn stains, a commercial-grade soot remover or a poultice may be necessary, but for most historical buildup, a patient application of TSP will restore the brick’s original color.
The Insulation Problem: How to Keep a Brick House Warm Without Covering the Brick?
One of the greatest challenges of living with exposed brick is its poor thermal performance. While solid and durable, brick is a thermal conductor, not an insulator. This means it readily transfers heat, making rooms with exposed brick walls feel cold in the winter and warm in the summer. The thermal resistance of a material is measured by its R-value, and brick performs very poorly in this regard. Thermal performance data shows that solid brick offers an R-value of just 0.2 per inch of thickness, compared to R-3.1 to R-4.3 per inch for fiberglass insulation. An 8-inch thick brick wall might only provide an R-value of 1.6, far below the R-13 to R-21 recommended for exterior walls in many climates.
Many homeowners mistakenly believe brick’s “thermal mass” equates to insulation. Thermal mass refers to a material’s ability to absorb, store, and later release heat. This property can delay heat transfer—meaning a brick wall will slow down the sun’s heat from entering on a summer day—but it does not stop it. In winter, that same thermal mass will absorb heat from your home and conduct it to the cold outdoors, actively working against your heating system. Covering the interior brick with drywall and insulation is the most effective solution from a pure energy perspective, but it sacrifices the very feature you want to preserve.
Case Study: The Value of Strategic Insulation
A study examining the thermal performance of brick walls confirmed this dynamic. Researchers found that while standard solid brick walls offer negligible insulation, their performance can be dramatically improved with supplementary systems. The study highlighted that brick’s thermal mass can delay heat transfer by up to 6 hours but does not prevent overall heat loss. The conclusion was clear: for true energy efficiency in homes with exposed interior brick, insulation strategies must be implemented on the exterior of the building (such as exterior insulation and finish systems, or EIFS) or within cavity walls. This leaves the interior brick exposed while creating the necessary thermal break to keep the home comfortable.
For loft owners, this means the most practical solutions are often not on the brick wall itself, but around it. This includes air sealing gaps in mortar and around window frames, installing heavy thermal curtains, and, most importantly, ensuring that other parts of the building envelope, like the roof and non-brick walls, are exceptionally well-insulated to compensate.
Windows or Insulation: Which Upgrade Lowers Your Footprint Faster?
When trying to improve the energy efficiency of a home with exposed brick, owners often face a choice between two major investments: upgrading insulation or replacing old windows. While drafty, single-pane windows are an obvious source of heat loss, improving a home’s overall insulation and air sealing typically provides a much faster and more substantial return on investment. The U.S. Environmental Protection Agency’s Energy Star program estimates that homeowners can save an average of 15% on heating and cooling costs simply by air sealing and adding insulation to critical areas like attics and crawlspaces. This is because heat loss occurs through the entire building envelope, and insulation addresses a much larger surface area than windows do.
In a home with solid brick walls, this principle is even more pronounced. As established, the brick itself has a very low R-value, making the walls a significant source of energy loss. While upgrading from single-pane to modern, high-performance, double- or triple-pane windows can reduce energy loss through the glazed areas by 25-50%, this gain is limited if the surrounding walls are still acting as thermal bridges. Prioritizing attic insulation, sealing air leaks around plumbing and electrical penetrations, and improving insulation in non-brick walls will often have a greater overall impact on your energy bills and carbon footprint.
The following table, based on industry data, breaks down the typical investment and return for each upgrade. As the numbers show, insulation consistently offers a better financial and environmental payback.
| Factor | Insulation Upgrade | Window Replacement |
|---|---|---|
| Initial Investment | Lower upfront cost ($1,500-$5,000) | Higher upfront cost ($4,500-$20,000) |
| Energy Savings Potential | Up to 30% energy loss addressed | 10-25% energy loss addressed |
| Return on Investment | 100-200% ROI | 60-70% ROI |
| Lifespan | 30-50+ years, minimal maintenance | 20-30 years, seals may fail |
| Best for Exposed Brick Homes | Air sealing gaps around windows/mortar | Upgrading single-pane to high-performance windows |
For the loft owner, the strategic takeaway is to first address air sealing and insulation in all accessible areas. Once the building envelope is tight, upgrading to more efficient windows will provide a significant and noticeable secondary benefit, further enhancing comfort and reducing energy consumption.
Uplighting vs. Downlighting: Which Is Best for Textured Stone Walls?
When applying the grazing light technique to a textured wall, the direction of the light—from above (downlighting) or below (uplighting)—creates distinctly different aesthetic effects. Neither is universally “better”; the optimal choice depends entirely on the desired mood and architectural statement. The key difference lies in how our brains interpret the resulting shadows.
Uplighting, where fixtures are placed on or near the floor and aimed upwards, tends to create a sense of drama, grandeur, and aspiration. The shadows are cast downwards, which is an inversion of how we typically experience natural light from the sun. This unnatural orientation draws attention, making the wall feel taller and more monumental. It’s an excellent choice for creating a dramatic focal point in a living room or entryway, lending a gallery-like quality to the space. However, uplighting can sometimes create unflattering shadows on people standing near the wall and may cause glare if the light sources are visible.
Downlighting, with fixtures mounted on or in the ceiling, produces a more natural and grounded effect. The shadows are cast downwards, mimicking sunlight. This often feels more comfortable and less theatrical. Downlighting is superb for defining a space, highlighting artwork on the wall, or creating intimate pools of light. It’s a more architectural approach that can make a wall feel solid and well-defined. The risk with downlighting is that if fixtures are placed too far from the wall, the grazing effect is lost, and you end up with “scallops” of light that can look dated. For a proper grazing effect, use recessed wall-washer fixtures or track lights positioned very close to the wall plane.
Key Takeaways
- Preservation First: Sealing brick is about consolidating the material with a breathable, penetrating sealer, not creating a surface film.
- Insulation is Key: Brick is a poor insulator. Address energy loss through strategic air sealing and insulating other parts of the building envelope before focusing on windows.
- Light Defines Texture: Use grazing light (uplighting or downlighting) to create dramatic shadows that reveal the depth and character of your brick wall.
How to Mix Metal Finishes in Lighting Without Clashing?
In a space defined by the raw, powerful texture of exposed brick, the choice of lighting fixtures and their metal finishes is critical. The goal is to complement the industrial or rustic character of the brick, not compete with it. A common design fear is that mixing different metal finishes—like black, brass, and chrome—will result in a chaotic, clashing look. However, when done thoughtfully, mixing metals adds depth, sophistication, and a curated feel to the space. The brick wall itself acts as a unifying, warm-toned backdrop that can tie disparate elements together.
The most successful strategy is to establish a dominant metal finish. This will be the primary metal used for the most prominent or numerous fixtures in the room, such as a large central chandelier or a series of track lights. For a classic industrial look against red brick, matte black is a foolproof dominant choice. It’s neutral, graphic, and allows the brick’s texture to remain the star. Once your dominant metal is set, introduce one or two accent metals in smaller doses. For example, if your track lighting is black, your wall sconces or a floor lamp could be in a warm brass or bronze. This adds a layer of visual interest and warmth that contrasts beautifully with both the black metal and the brick.
To ensure a cohesive look, follow a few simple rules. First, keep the finishes consistent in their sheen; if you’re using a matte black, pair it with a satin brass rather than a highly polished one. Second, try to separate the different metals by height or location. For instance, use one metal for overhead lighting and another for task lighting at table level. Finally, the style of the fixtures can act as a unifying thread. Using different metal finishes on fixtures that share a similar modern, minimalist, or vintage-inspired form will create a look that feels intentionally designed, not accidentally accumulated.
By approaching your exposed brick not as a static backdrop but as a dynamic material requiring specific care, you can solve practical problems like dust while enhancing its inherent beauty. The right technical choices in sealing, insulation, and lighting will preserve this valuable architectural feature for years to come, ensuring it remains a source of character and not frustration.