Creating intimacy in a large yard isn’t about adding objects; it’s about defining a “room without walls” through sensory design.
- Define the zone with proper clearance for seating and a distinct “Social Flow Zone” for movement.
- Layer warm, low-level lighting to create a psychological ceiling that fosters closeness.
- Use strategic warmth, textured flooring, and plant barriers to complete the sense of a private enclosure.
Recommendation: Focus on creating a multi-sensory experience where every element—from the ground underfoot to the quality of light—contributes to a feeling of personal retreat.
That beautiful, expansive yard you love can sometimes feel like a liability when it comes to hosting. The dining table, meant to be a hub of connection, can feel lost and exposed, dwarfed by the open space around it. Guests may feel on display, conversations might seem to dissipate into the air, and the intended cozy atmosphere never quite materializes. The common advice often involves large, expensive structures or simple decorative touches. You’ve probably considered a permanent pergola or perhaps an outdoor rug to anchor the space.
But what if the solution isn’t purely structural, but spatial and psychological? As landscape architects, we don’t just fill space; we shape human experience within it. The key to transforming an exposed dining spot into an intimate haven lies in creating a “room without walls.” This is achieved not by building barriers, but by sculpting the space with sensory layers—light, texture, warmth, and sound—that subconsciously signal enclosure and comfort. It’s about making a vast area feel personal and protected.
This guide will walk you through the architectural principles for zoning your outdoor dining area. We will define its functional footprint, layer the essential sensory elements to create a psychological boundary, and select materials that enhance the feeling of an exclusive, open-air retreat. By thinking like a designer, you can draw people in and make your large yard the perfect setting for intimate gatherings.
To help you create this perfect outdoor room, we’ve broken down the process into key design decisions. The following summary outlines each step, from establishing the spatial foundation to layering the final atmospheric touches.
Summary: How to Zone an Outdoor Dining Area for Intimacy in a Large Yard?
- The 3-Foot Rule: How Much Space Do You Need Around an Outdoor Table?
- Solar vs. Battery: Best Wireless Lighting for Outdoor Dining
- How to Keep Wasps Away From Your Outdoor Dinner Without Chemicals?
- Fire Pit or Patio Heater: Which Is Better for Dining Warmth?
- Gravel vs. Pavers: Which Surface Is Easier to Clean Under a Dining Table?
- The Winter Risk: Why Composite Planks Get Slippery and How to Fix It
- How Many BTUs Do You Need to Actually Feel Warm on a Windy Night?
- Is a Bioclimatic Pergola Worth the Investment for Small Patios?
The 3-Foot Rule: How Much Space Do You Need Around an Outdoor Table?
Before you can create intimacy, you must first define the physical space. The foundation of any well-designed dining zone is allocating the right amount of room for both function and comfort. The biggest mistake homeowners make is underestimating the space needed for chairs and movement, resulting in a cramped and awkward experience. The starting point is a simple but non-negotiable industry standard. For any dining table, you must allow for a minimum clearance on all sides for guests to comfortably pull out their chairs and be seated.
To achieve this, industry standards recommend at least 3 feet (36 inches) of open space behind each chair. This is the absolute minimum functional zone. However, to elevate the area from merely functional to truly comfortable and social, we must think beyond the chair. This is where we design the ‘Social Flow Zone’—an additional 2-3 feet of space beyond the chair pull-out area. This buffer is critical; it allows for circulation, serving, and mingling without disrupting seated guests. It’s the invisible boundary that transforms a simple table setting into a designated social hub.
For a rectangular table for eight, this means your total defined “floor plan” could be as large as 12 by 18 feet. This generous allocation prevents the feeling of being trapped at the table and encourages a more relaxed, free-flowing social dynamic. This defined footprint is the canvas upon which we will layer all other elements of intimacy.
Solar vs. Battery: Best Wireless Lighting for Outdoor Dining
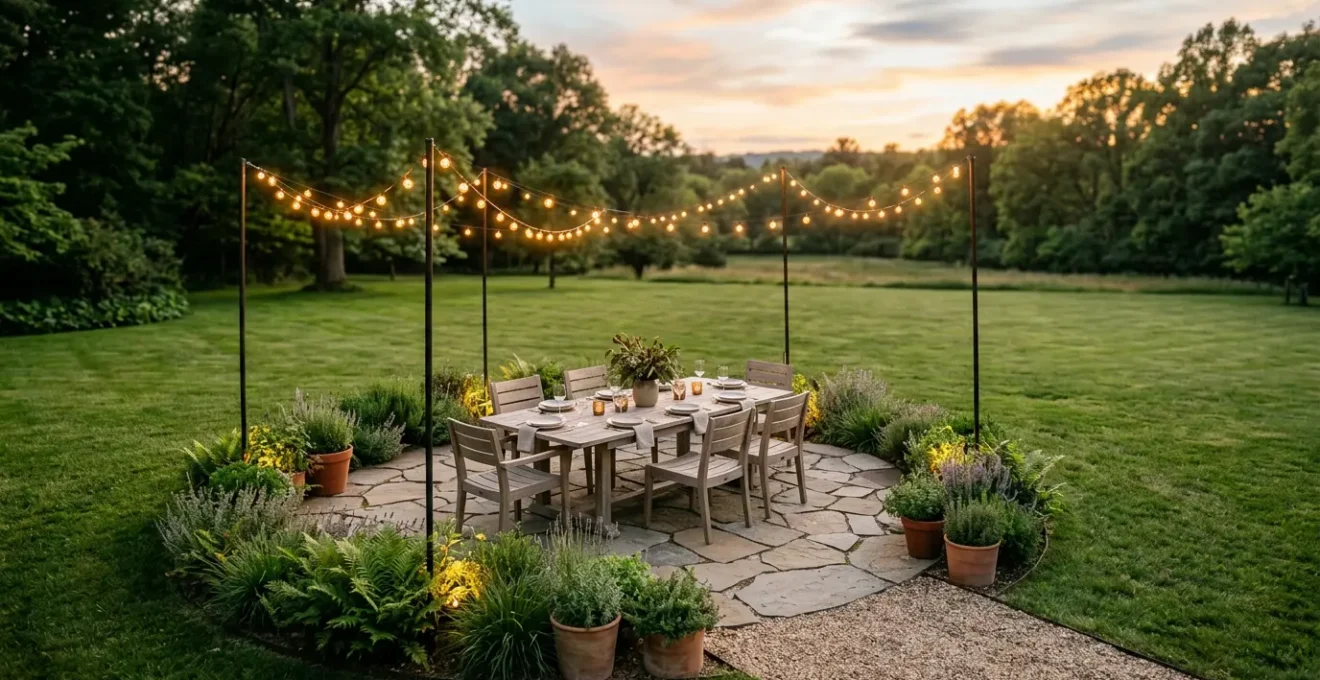
With the floor plan defined, the next step is to create the “ceiling” and “walls” of your outdoor room. Light is the most powerful tool for this. The goal is to create a pool of warm, inviting light that establishes a psychological boundary, making the surrounding darkness feel like the walls of a room. This effect is ruined by harsh, cool, or inconsistent lighting. For true intimacy, the quality of light is paramount.
The key is to use layered, low-level, and warm-toned illumination. For an atmosphere that encourages connection and relaxation, lighting experts confirm that a color temperature under 3000K is essential, with 2700K being the gold standard for a warm, candle-like glow. This is where the choice between solar and battery power becomes a crucial design decision. While solar is eco-friendly, its light is often inconsistent, dimming as the evening progresses, and typically comes in cooler temperatures (3000K-4000K). This variability undermines the stable, intimate atmosphere you’re trying to create.
As the image above illustrates, a successful lighting scheme layers multiple sources. Battery-powered LED lights are superior for this task because they provide a stable, consistent output at the ideal 2700K color temperature throughout the evening. They offer full dimming capabilities, allowing you to tailor the mood perfectly. Use a combination of sources: rechargeable table lamps for a central glow, battery-operated uplights on surrounding plants to create soft, vertical “walls” of light, and warm-white string lights hung low to define the “ceiling” of your space.
How to Keep Wasps Away From Your Outdoor Dinner Without Chemicals?
Nothing shatters an intimate atmosphere faster than uninvited, buzzing guests. Wasps are drawn to food and can quickly turn a relaxing dinner into a stressful ordeal. While chemical sprays are an option, they introduce unpleasant odors and toxins into the very space you’re trying to make comfortable and inviting. A landscape architect’s approach is to integrate pest control into the design itself, creating beautiful, natural deterrents that enhance the sense of enclosure.
The most elegant solution is to create a ‘living moat’ of wasp-repellent plants. By strategically placing specific plants around the perimeter of your dining zone, you create an invisible aromatic barrier that wasps instinctively avoid. This method turns functional pest control into a core part of your design.
- Mint: Its strong scent is highly effective. Plant it in pots around the dining perimeter to create a fragrant, invisible fence.
- Citronella Grass: Use tall specimens along pathways leading to the dining area to form a lemon-scented corridor that guides wasps away.
- Thyme: This low-growing herb is perfect for planting along the edges of a patio or between pavers, releasing its deterrent fragrance when brushed against.
- Eucalyptus: The powerful menthol oils are a potent repellent. A large potted specimen can anchor a corner of your zone, but place it carefully as it can be toxic to pets.
Another highly effective, non-chemical method is to create an invisible wall of air. Wasps are weak flyers and actively avoid turbulent air currents. Installing a stylish outdoor ceiling fan under a pergola or strategically placing an oscillating floor fan upwind of your table creates a gentle but persistent airflow that makes the dining zone an inhospitable “no-fly zone” for wasps. This technique not only deters pests but also adds a layer of cooling comfort for your guests, seamlessly blending function with luxury.
Fire Pit or Patio Heater: Which Is Better for Dining Warmth?
As dusk falls and a chill enters the air, warmth becomes the final, crucial layer for creating a lasting sense of intimacy. A heat source does more than just raise the temperature; it acts as a primal anchor, drawing people together and encouraging them to linger. The choice between a functional patio heater and an atmospheric fire pit has a profound impact on the social dynamics of your space. While both provide heat, they serve fundamentally different roles in your outdoor room.
A patio heater is a utility. It excels at providing consistent, directional, and often overhead warmth across a large area. It’s silent, smoke-free, and effective. However, it offers almost no ambiance. A fire pit, on the other hand, is a social centerpiece. Its mesmerizing flames provide a focal point, its circular shape encourages face-to-face interaction, and the radiant glow creates an unmatched atmosphere of communal comfort. Its weakness is that smoke can be an issue during the meal itself, and its heat is more localized.
The following table, inspired by expert comparisons, highlights these critical differences in social and functional performance.
| Factor | Fire Pit | Patio Heater |
|---|---|---|
| Heat Output (BTU) | 30,000-150,000 BTU (wood highest) | 30,000-50,000 BTU |
| Heat Distribution | Radiant in all directions; localized warmth | Directional/overhead; larger coverage area |
| Social Dynamics | Central focal point encouraging circular gathering and eye contact | Functional heater; no gathering effect |
| Intimacy Factor | High – mesmerizing flames create shared experience | Low – utility object with minimal ambiance |
| Operating Cost/Hour | $0.25-$0.75 (gas/wood) | $1.50-$3.00 (propane) |
| Wind Susceptibility | High – heat dissipates in wind | Moderate – elevated position helps |
The Hybrid Solution: Sequential Heating Strategy for Multi-Phase Dining
To get the best of both worlds, outdoor design experts recommend a hybrid, sequential approach. During the active dining phase, use an overhead infrared patio heater for silent, smoke-free, directional warmth that doesn’t interfere with food or conversation. Once the meal is over and guests shift to drinks and socializing, the patio heater is turned off, and a central gas fire pit becomes the star. It provides the atmospheric, communal warmth and visual focal point that encourages guests to linger, relax, and connect on a deeper level. This strategy tailors the heat source to the social phase of the evening, maximizing both comfort and intimacy.
Gravel vs. Pavers: Which Surface Is Easier to Clean Under a Dining Table?
The “floor” of your outdoor room is a foundational sensory element that is too often overlooked. The material underfoot affects everything from chair stability to the acoustic quality of the space. While pavers offer a hard, easy-to-clean surface, they can feel sterile and do little to absorb sound, creating a harsh, reflective environment. Gravel, while offering a soft, natural aesthetic and a pleasing “crunch,” is notoriously difficult to clean and can make chairs unstable.
However, there is a third way that combines the best of both: Decomposed Granite (DG). DG is a fine, crushed rock that, when properly compacted, forms a solid, stable surface that is still permeable. It provides the high stability of pavers, ensuring chairs don’t wobble, but retains a soft, natural look similar to gravel. Spills and crumbs can be swept or lightly raked away, offering a maintenance level far superior to loose gravel. This surface choice is a mark of sophisticated landscape design.
As this detailed view shows, the texture of the ground is a key part of the experience. The choice of flooring influences the entire zone’s character. DG offers a unique soundscape—a soft, muted shuffle rather than the loud crunch of gravel or the silence of concrete—which adds to the intimate ambiance. It’s the perfect middle ground, providing a cleanable, stable, and aesthetically pleasing foundation for your dining area.
| Feature | Gravel | Pavers | Decomposed Granite (DG) |
|---|---|---|---|
| Cleaning Ease | Difficult – food falls between stones | Easy – sweepable solid surface | Moderate – compacted but sweepable |
| Chair Stability | Low – wobble risk, requires gravel grids | High – rock-solid stability | High – when properly compacted |
| Soundscape | Audible ‘crunch’ – defines space sonically but can disrupt conversation | Silent footfalls | Soft, muted sound |
| Visual Aesthetic | Soft, natural, rustic | Formal, structured, clean lines | Natural and soft like gravel, but unified surface |
| Installation Complexity | Easy – pour and spread | Moderate – requires leveling and edging | Moderate – requires compacting layers |
| Cost | Low | High | Moderate |
Key takeaways
- Define your space with the “3-foot rule” plus a 2-3 foot “Social Flow Zone” for elegant movement.
- Create intimacy with layered, warm lighting (2700K) to form a psychological ceiling and soft walls.
- Choose surfaces like decomposed granite and heat sources like fire pits for their sensory and social contributions, not just their function.
The Winter Risk: Why Composite Planks Get Slippery and How to Fix It
While creating your dining zone, it’s wise to consider year-round safety, especially if your dining surface is part of a larger composite deck. Composite decking is a popular low-maintenance choice, but it holds a hidden winter risk: it can become extremely slippery. This occurs because most composite materials contain plastics (like PVC or polyethylene), which create a non-porous surface. Unlike wood, which absorbs a small amount of moisture, composite decking allows frost, algae, or a thin layer of moisture to sit directly on top, creating a treacherous, ice-like film.
This slipperiness is exacerbated by smooth-surfaced or older-generation composite planks. The lack of texture provides no grip for shoes, turning a simple walk across the deck into a hazard. The issue is most pronounced in shaded, damp areas where biofilm and algae can grow, or during morning dew and light frost cycles in the colder months.
To mitigate this risk without sacrificing style, there are several design-oriented solutions. First, when selecting materials, opt for modern, high-quality composite boards with a deep, embossed wood-grain texture. This texture provides crucial micro-channels for water to disperse and offers better mechanical grip. Second, consider using stylish, weather-proof outdoor runners or area rugs specifically in high-traffic pathways during winter months. Finally, a regimen of regular cleaning with a stiff-bristled brush can prevent the microscopic algae and biofilm from forming in the first place, keeping the surface safe and visually appealing all year long.
How Many BTUs Do You Need to Actually Feel Warm on a Windy Night?
To truly feel warm on a windy night, you need to think in terms of creating a ‘heat bubble’ with radiant heat, not just a raw BTU number. Wind is the enemy of warmth because it blows away heated air. This is why you must choose radiant (infrared) heaters, which heat objects and people directly, rather than convective heaters, which just heat the air. For an exposed patio, a common target is a minimum of 45,000 BTUs of radiant heat, but this must be calculated based on your specific dining area and wind exposure.
A simple BTU rating on a product is misleading. The real measure of effectiveness is how well that heat can be delivered to your guests despite the wind. This requires a more strategic calculation to ensure your investment in a heating system actually pays off in comfort. The following formula provides a practical method for determining your true BTU needs for a cozy “heat pocket.” The information for this formula is based on guidance from heating experts, who emphasize a calculated approach to achieve genuine warmth.
Your Action Plan: The Heat Bubble Formula for Windy Conditions
- Measure Your ‘Intimacy Zone’: Calculate the square footage of the defined dining area where people will be seated (typically 100-150 sq ft for a table of 6-8).
- Assess Your Wind Factor: Rate your location’s exposure. A sheltered area (surrounded by walls/hedges) has a factor of 1.0; a partially exposed area (one open side) is 1.25; a fully exposed area in an open yard is 1.5.
- Apply the Formula: Use the calculation: (Square Footage) x (Wind Factor) x 300 = Minimum Radiant BTU Target. For example, a 100 sq ft exposed patio: 100 x 1.5 x 300 = 45,000 BTU minimum.
- Choose RADIANT Heaters: Ensure your chosen heaters are radiant (infrared). This technology is key, as its heat is not carried away by the wind.
- Use Cross-Coverage: In windy locations, it is often more effective to use two lower-BTU radiant heaters positioned for cross-coverage rather than one single high-BTU unit. As confirmed by heating specialists, this creates a more consistent and resilient ‘heat pocket’.
Is a Bioclimatic Pergola Worth the Investment for Small Patios?
For those with smaller patios, the idea of adding a structure like a pergola can seem counterintuitive, as if it might consume precious space. However, a bioclimatic pergola is not just a structure; it’s a dynamic system that multiplies the usability of your outdoor area. Unlike a traditional fixed-roof pergola, a bioclimatic model features adjustable motorized louvers. This single feature is what makes it an exceptionally worthwhile investment, especially for a compact space.
The value lies in its adaptability. On a perfect sunny day, you can angle the louvers to provide partial shade while allowing airflow. When an unexpected shower passes through, you can close them completely to create a waterproof roof, saving your dinner party. On a hot, still afternoon, opening them fully allows heat to escape. This ability to instantly respond to the weather transforms your patio from a “fair-weather-only” space into a reliable, three-season outdoor room. For a small patio, this effectively doubles or triples the amount of time you can comfortably use the space each year.
Furthermore, it provides a permanent framework to integrate the other layers of intimacy we’ve discussed. You can mount infrared radiant heaters for warmth, install a ceiling fan for wasp-deterring airflow, and hang string lights for that perfect ambient glow. It turns a collection of separate elements into one cohesive, highly functional, and luxurious living area. So, is it worth it? If the goal is to maximize every square foot of your property and create a truly usable outdoor extension of your home, then for a small patio, the investment in a bioclimatic pergola offers an unparalleled return in lifestyle and versatility.
Now that you understand the principles of spatial design, the next step is to apply them. Start by mapping out your own ‘Social Flow Zone’ and build your layers of intimacy from there to transform your yard into the retreat you’ve envisioned.